Remove Background from Image: How AI Does It + Free Online Tool
Learn how AI background removal works using neural network segmentation, when it struggles with hair and glass, and the best techniques for perfect transparent PNG results.
Founder & Developer, ToolNest AI
Published
Background removal used to require Photoshop skills, patience, and often a professional. Today an AI model does a better job in under a second. This guide explains exactly how that works — the model architecture, how it handles tricky edges, why some images work better than others, and how to get the cleanest possible transparent PNG output.
Remove any background instantly with the ToolNest AI Background Remover — free, private, and entirely in your browser.
How AI Background Removal Works
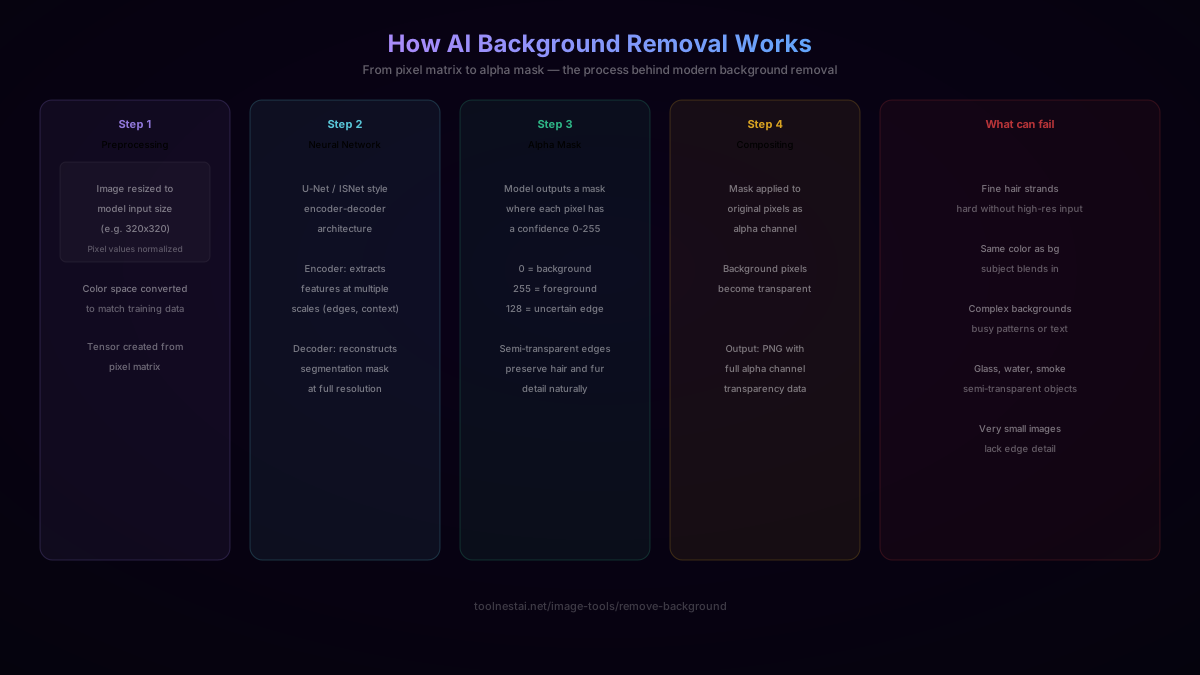
Modern background removal is a semantic segmentation problem: the AI must classify every single pixel in the image as either foreground (keep) or background (remove), with varying degrees of confidence for pixels along edges.
The dominant architecture for this task is a U-Net (or variants like ISNet, U2Net), which uses an encoder-decoder structure:
Encoder (downsampling path): Takes the input image (resized to the model's expected input dimensions, typically 320×320 or 512×512) and progressively reduces spatial resolution while increasing the number of feature channels. Early stages capture local detail like edges and textures; later stages capture global semantic context — understanding that a person's arm belongs to the foreground even when the edge is ambiguous.
Bottleneck: The compressed representation at the bottom of the U contains the most abstract understanding of "what is in this image and where" — but at very low spatial resolution.
Decoder (upsampling path): Progressively restores spatial resolution back to the original input size. The key innovation of U-Net is skip connections: feature maps from matching encoder stages are concatenated to the corresponding decoder stages, allowing fine spatial detail (exact edge positions) from early encoder stages to be combined with semantic understanding (object classification) from deeper stages. Without these skip connections, the output mask would be spatially blurry.
Output: A single-channel mask at the input resolution, where each pixel value represents the model's confidence that the pixel belongs to the foreground: 0 = definitely background, 255 = definitely foreground, and intermediate values represent uncertainty — typically used for soft edges around hair, fur, and translucent objects.
Understanding the Alpha Mask
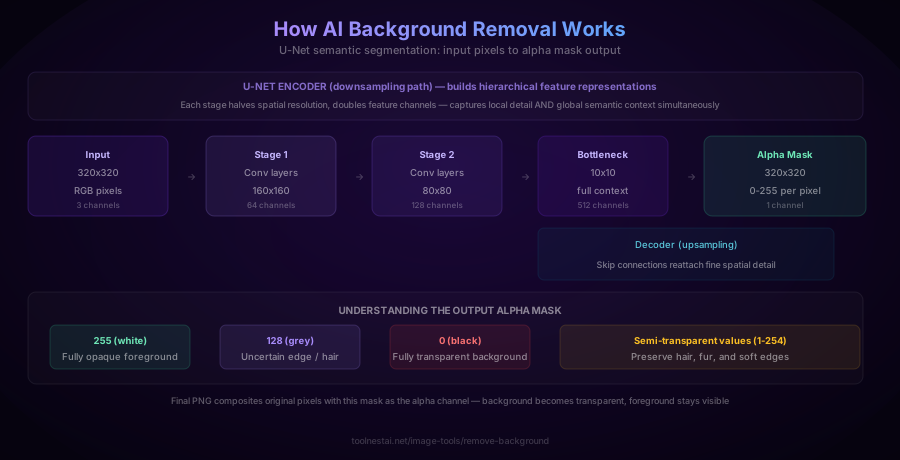
The mask output isn't just binary (keep/remove). Every pixel in the segmentation mask has a value from 0 to 255, which becomes its alpha channel value in the output PNG:
- 255 (white in the mask): Fully opaque — this pixel is certainly part of the foreground and renders at 100% opacity in the output
- 0 (black in the mask): Fully transparent — this pixel is certainly background and becomes completely invisible in the output
- 128 (mid-grey in the mask): 50% transparency — the model is uncertain, or this pixel genuinely straddles the subject/background boundary (common along hair strands or fur)
- Any value in between: Partially transparent — the fractional opacity blends the foreground pixel with whatever is placed behind it in the final composite
This continuous alpha value is exactly what gives modern AI background removal its characteristic softness at edges. A classic chroma-key approach (green screen removal) treats every pixel as either in or out based on color threshold. The neural network approach produces gradual transitions that look natural — individual hair strands end up semi-transparent, blending smoothly with any new background rather than creating a jagged cut.
The final PNG simply uses the original image's RGB pixel values plus this computed alpha mask as the A channel — standard RGBA PNG format.
Use Cases and Best Input Images
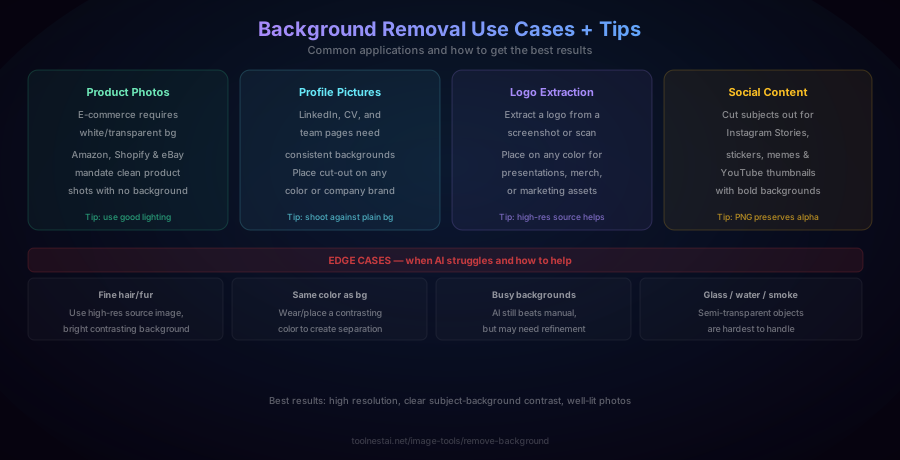
Product Photography
E-commerce platforms including Amazon, Shopify storefronts, and eBay have specific requirements for product images: typically a pure white or transparent background with the product clearly visible and well-lit. Manual background removal for product photography is extremely time-consuming at scale; AI reduces this from minutes per image to seconds. The clean result can then be placed on any background — white for marketplace listings, brand colors for social content, or left transparent for design use.
Profile Pictures and Headshots
Professional headshots need consistent backgrounds across a team page, LinkedIn profile, or CV. Shooting everyone against the same background isn't always possible; AI removal lets you extract any portrait and place it on a consistent branded color, gradient, or stock background. The result looks professionally shot even when taken in different environments.
Logo and Graphic Extraction
When you receive a logo as a screenshot, JPEG, or scanned document and need it on a transparent background for design use — presentations, merchandise, digital assets — background removal handles this quickly. The result is a clean transparent PNG that can be placed on any color without the white box problem that appears when you simply place an opaque JPEG.
Social Media and Content Creation
Cut subjects out of photos for Instagram Stories stickers, YouTube thumbnails with bold contrasting backgrounds, meme templates, or custom profile picture frames. A clean cut-out on a transparent background is a fundamental building block for this kind of content.
Edge Cases: When AI Background Removal Struggles
No AI model is perfect. Understanding the failure modes helps you work around them:
Fine hair and fur: Individual strands that are significantly thinner than one pixel at the model's input resolution are genuinely difficult to segment accurately. The model may fill in the silhouette of a hair mass rather than preserve individual strands. Fix: use the highest resolution source image you can — more pixels per hair strand gives the model more to work with.
Subject the same color as the background: If someone wears a beige shirt against a beige wall, there's no color boundary for the model to detect. The model falls back on learned shape priors (a human torso shape) which may not be sufficient. Fix: introduce contrast — wear a contrasting color, or photograph against a strongly contrasting background.
Busy, complex backgrounds: A dense crowd, heavily patterned wallpaper, or a scene where the subject is partially occluded by foreground objects creates genuine ambiguity about what's foreground and what isn't. The model may make errors along complex boundaries. Fix: AI still beats manual selection for complex backgrounds, but you may need to refine edges.
Glass, water, and smoke: Semi-transparent objects are the hardest case. A glass bottle that partially shows the background through it is genuinely ambiguous — it's part foreground, part background, at the pixel level. Most models will treat it as fully opaque foreground, which can look wrong. There's no clean programmatic fix here; manual refinement may be needed.
Very small images: Low resolution means the edges have few pixels to work with, making accurate segmentation harder. Always use the largest available source image.
Programmatic Background Removal
For batch processing or automated pipelines, you don't need to use a web tool for each image. Several good options exist:
Python with rembg (open source, runs locally):
from rembg import remove
from PIL import Image
import io

with open("photo.jpg", "rb") as f:
    output = remove(f.read())

img = Image.open(io.BytesIO(output))
img.save("result.png")
rembg uses U2Net, an open-source U-Net variant trained on large salient object detection datasets. It runs entirely locally with no API key needed, making it suitable for private or high-volume processing.
Node.js with @imgly/background-removal (runs in browser too):
import { removeBackground } from "@imgly/background-removal";

const blob = await fetch("photo.jpg").then(r => r.blob());
const result = await removeBackground(blob);

const url = URL.createObjectURL(result);
This library uses the ONNX Runtime to run the model directly in the browser or Node.js, which is the same approach used in browser-based tools like the one here at ToolNest AI.
Python saving with explicit background fill:
from rembg import remove
from PIL import Image

img = Image.open("photo.jpg")
result = remove(img)

# To get transparent PNG:
result.save("transparent.png")

# To get white background instead:
white_bg = Image.new("RGBA", result.size, (255, 255, 255, 255))
white_bg.paste(result, mask=result.split()[3])
white_bg.convert("RGB").save("white_bg.jpg")
Output Format: Always PNG
A crucial point often missed: the output of background removal must be saved as PNG, not JPEG.
JPEG does not support an alpha channel — it has no way to represent transparency. If you save a transparent PNG as JPEG, every transparent pixel becomes white (or whichever fill color the encoder defaults to), and you lose all the transparency work the AI just did.
PNG's alpha channel is specifically designed for this: RGBA PNG stores red, green, blue, and alpha values for every pixel, preserving the full semi-transparent edge data that gives the result its quality.
If you need to place the subject on a specific background color and export as JPEG (for file size reasons, for example), the correct workflow is:
- Remove background → get transparent PNG
- Create a new canvas filled with your chosen background color
- Composite the transparent PNG over that background
- Export the composite as JPEG
This preserves edge quality instead of silently filling edges with white.
Tips for Best Results
A few practical observations from processing large numbers of images through AI background removal:
Resolution matters more than anything else. A 3000×4000 pixel portrait produces dramatically better hair edges than a 400×500 pixel version of the same photo. The model has more pixels to work with at each edge pixel.
Even lighting reduces edge ambiguity. Harsh shadows across the subject can create areas where the model is uncertain whether a dark area is shadow (foreground) or background. Even, diffuse lighting eliminates these ambiguous zones.
Plain contrasting backgrounds are ideal. A plain blue or green wall gives the model a clear signal about background color, making the foreground/background boundary unambiguous. This is why studio photography and green screens produce the cleanest results even with AI removal.
Check edges at 100% zoom before finalizing. What looks clean at 50% zoom may have jagged edges or missed hair strands at full size. Zoom in on the most complex edge areas before delivering the result.
Frequently Asked Questions
How does AI background removal work?
Modern background removal uses a neural network (typically a U-Net or variant) trained to perform semantic segmentation — classifying every pixel as foreground or background with a confidence value from 0-255. This confidence becomes the alpha channel in the output PNG, producing smooth semi-transparent edges around hair and fur rather than the hard cutouts you'd get from threshold-based approaches.
Why do some images come out worse than others?
Image quality heavily affects results. Fine hair strands, subjects the same color as the background, very busy backgrounds, and semi-transparent objects like glass are the hardest cases. High-resolution images with strong subject-to-background contrast consistently produce the best results.
Can I use it on photos with multiple people?
Yes. The model segments all foreground subjects, not just a single person. It uses learned shape and context priors to identify what's foreground, so multiple subjects are typically handled correctly. Results depend on how well-separated the subjects are from the background.
Does removing the background reduce image quality?
The foreground pixels themselves are copied from the original image exactly — there's no recompression or quality loss applied to the subject. The only change is that background pixels become transparent. If you then save as JPEG (which doesn't support transparency), the edges may look slightly different due to the JPEG compression of the alpha-channel boundary area, which is why PNG is always recommended for output.
Is my image uploaded to a server?
The ToolNest AI background removal tool runs entirely in your browser using the ONNX Runtime. Your image is never uploaded to any server — it stays on your device throughout the entire process. This makes it private and suitable for sensitive images.
What's the difference between AI removal and green screen removal?
Green screen (chroma keying) removes a specific color based on a threshold — every pixel within a certain color distance of the key color is removed. This requires controlled studio lighting and a specific background color, and produces hard binary edges. AI segmentation learns from millions of images to understand what "foreground" and "background" look like in general, works on arbitrary backgrounds, and produces soft semi-transparent edges. AI removal is generally more flexible; green screen can be more precise in controlled conditions.
Why must the output be PNG and not JPEG?
JPEG has no alpha channel — it cannot represent transparency at all. Saving a removed-background result as JPEG fills every transparent pixel with a solid background color (usually white), destroying the transparency data. PNG's RGBA format stores an alpha value for every pixel, preserving the semi-transparent edges that make the result look natural on any background.
About the author
Emir LočićI'm a developer focused on building practical online tools, with several years of experience in web development. I created ToolNest AI to make useful AI-powered tools simple, accessible, and free to use in one place.
Related Articles
Image Cropper: Aspect Ratios, Composition, and Platform Dimensions
Learn how image cropping works, the standard aspect ratios for every major platform, how to apply the rule of thirds for better composition, and the difference between crop and resize. Free online image cropper tool.
PNG to JPG Converter: File Size, Transparency, and Quality Guide
Learn how PNG to JPG conversion works, how much file size you can save, what happens to transparency (spoiler: it's gone), how to choose the right quality setting, and when WebP is a better option. Free online tool.
Image Compressor: How to Reduce File Size Without Losing Quality
Learn how JPEG compression actually works, the optimal quality setting for web images, the difference between lossy and lossless compression, and the mistakes that silently degrade your images. Free online image compressor tool.