PNG to JPG Converter: File Size, Transparency, and Quality Guide
Learn how PNG to JPG conversion works, how much file size you can save, what happens to transparency (spoiler: it's gone), how to choose the right quality setting, and when WebP is a better option. Free online tool.
Founder & Developer, ToolNest AI
Published
PNG files are lossless, flexible, and universally supported — but they're also large. A photograph saved as PNG can easily reach 5-10 MB, while the same photo as a well-compressed JPG might be 600 KB with no visible quality difference at normal screen viewing sizes. Converting PNG to JPG is one of the highest-impact single-step optimizations for web performance.
There's one critical caveat: transparency. JPG has no alpha channel. Any transparent pixels in your PNG will be filled with a background color in the output JPG — and if you don't choose that color deliberately, you'll likely get an unwanted white box.
Convert instantly with the ToolNest AI PNG to JPG Converter — no uploads, entirely browser-based.
What You Gain and What You Lose
What you gain:
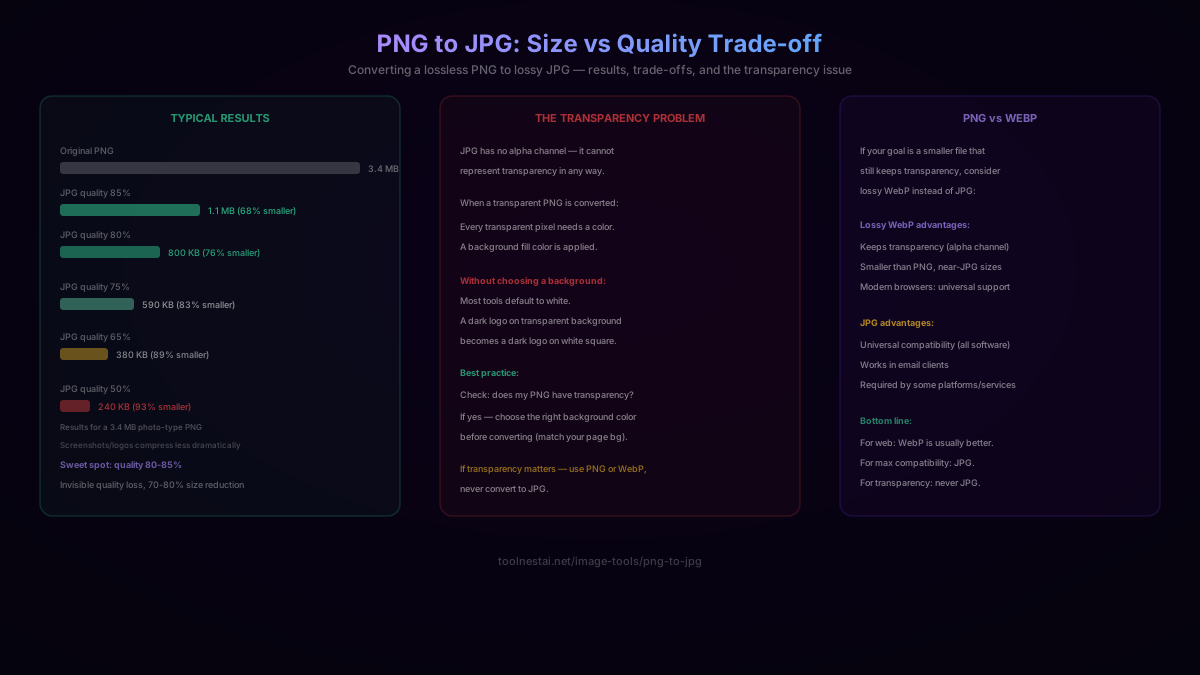
- Dramatically smaller files. A 3.4 MB photo-type PNG typically converts to 680 KB at quality 82% — an 80% reduction.
- Universal email compatibility. Some email clients have size limits or don't handle PNG well. JPG is accepted everywhere.
- Platform compatibility. Some web platforms, image processing pipelines, and older software prefer or require JPG.
What you lose:
- Lossless quality. JPG uses lossy compression — it permanently discards some pixel data. The discarded data cannot be recovered later.
- Transparency. JPG has no alpha channel at all. Transparent areas will be filled with a solid background color.
- Safe re-saving. Re-saving a JPG multiple times degrades it further (generation loss). PNG can be re-saved indefinitely without degradation.
The Transparency Problem
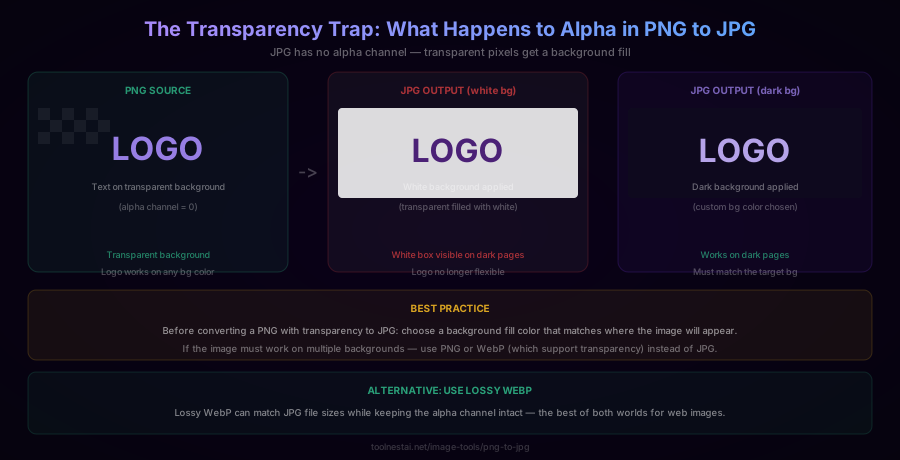
This is the most commonly overlooked issue in PNG to JPG conversion, and it causes a specific, very recognizable error: a logo or icon that appears on a website with an unwanted white box around it.
JPG has no alpha channel — the format specification simply doesn't include any concept of transparency. Every pixel in a JPG must be a solid color. When converting a PNG that has transparent areas:
- The converter reads the pixel values from the PNG
- For pixels that are partially or fully transparent, the alpha value is combined with a background fill color
- The result is a fully opaque JPG where the formerly transparent areas now have a solid background
The default fill is usually white. This is fine if your PNG will appear on a white background — but if it appears on a dark, colored, or textured background, you'll get the white box effect.
How to avoid it:
- Before converting, check whether your PNG has transparency (look for a checkerboard pattern in image editors where transparency is visible)
- If it does, choose a fill background color that matches where the image will appear
- If the image must work on multiple backgrounds (a logo that goes on both dark and light pages), you should use PNG or WebP — not JPG
The lossy WebP alternative: if you need both smaller file sizes and transparency, lossy WebP is the format to use. WebP supports the alpha channel (full transparency) while achieving file sizes comparable to JPG. Browser support is near-universal for modern browsers.
How Much Can You Reduce the File Size?
The size reduction depends heavily on what's in the PNG:
Photographic content (photos, natural images): PNGs of photographs compress very well to JPG because lossless encoding of continuous-tone photos is inherently inefficient — PNG's DEFLATE algorithm can find little to compress in images where nearly every pixel has a different value. Converting at quality 82%:
- Typical PNG: 3-8 MB
- Typical JPG at Q82: 400 KB - 1.1 MB
- Reduction: 75-90%
Screenshots and UI elements: These have more repeated pixels (solid backgrounds, flat UI elements), so the original PNG compresses better, and the JPG conversion produces a less dramatic reduction. More importantly, screenshots often contain sharp text where JPEG artifacts become visible at lower quality settings.
- Typical PNG screenshot: 500 KB - 2 MB
- Typical JPG at Q82: 150 KB - 700 KB
- Reduction: 50-75%
Logos and graphics: Similar to screenshots — many repeated pixels, sharp edges. Artifacts on hard edges and flat colors are more visible than in photographs.
- Typical PNG logo: 50-500 KB
- Typical JPG at Q82: 30-300 KB
- Reduction: 30-60%
Choosing the Right Quality Setting
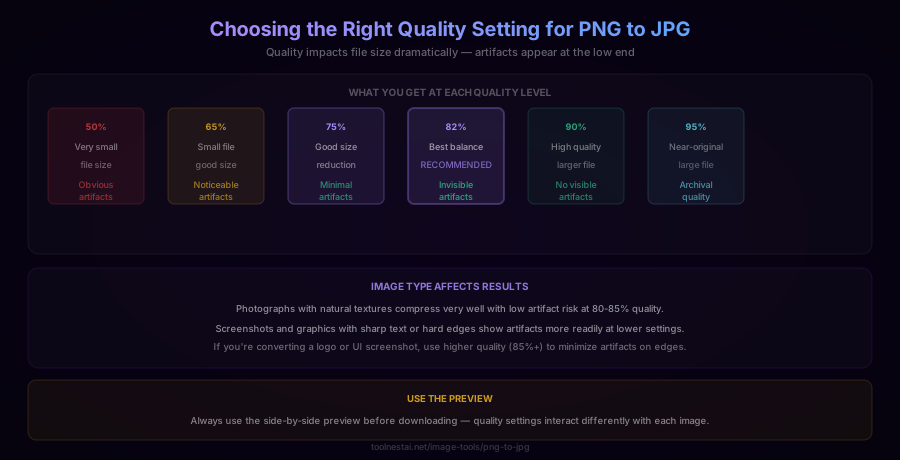
The quality slider controls how aggressively JPEG's compression algorithm discards high-frequency detail. Higher quality = less discarded = larger file. The relationship is not linear — the top end of the quality range (90-100%) adds enormous file size for imperceptible benefit, while the bottom end (below 60%) reduces size aggressively at the cost of increasingly visible artifacts.
Quality 50-65%: Very small files. Artifacts visible at normal viewing sizes, especially in areas with fine detail, sharp edges, or sky gradients. Appropriate for thumbnails only.
Quality 65-75%: Small files with minor artifacts you'd notice if looking for them. Acceptable for social media where content takes priority over perfect sharpness.
Quality 75-85% — recommended for most web use. Files are 75-90% smaller than PNG with invisible quality degradation for typical photographic content. This is the range used by major image optimization services and consistent with Google's web performance recommendations. Start at 82% and use the preview to verify for your specific image.
Quality 90-100%: Near-original visual quality, but large files. Appropriate for source files, print output, or archival use where repeated editing requires maximum quality preservation.
Important nuance for PNG sources: unlike converting from a JPG (where quality was already set on the source), converting from a high-quality PNG source means your first JPG conversion sets the quality — there's no pre-existing lossy artifact to consider. Start at quality 82% and adjust based on what the preview shows.
PNG to JPG vs PNG to WebP
If you're converting PNG for web use, it's worth comparing JPG and WebP output side by side:
| Consideration | JPG | Lossy WebP |
|---|---|---|
| File size (vs PNG) | 75-90% smaller | 75-90% smaller |
| Transparency | Lost (filled) | Kept (full alpha) |
| Browser support | Universal | Modern browsers (Chrome, Firefox, Safari, Edge) |
| Software support | Universal | Limited in older desktop apps |
| Email support | Works everywhere | Not widely supported |
| Quality artifacts | JPEG block pattern | WebP artifacts (different character) |
For modern web pages, lossy WebP is generally the better choice if your PNG has transparency — same size savings but the alpha channel is preserved. If compatibility with older software, email clients, or specific platforms is required, JPG is the safe universal fallback.
How to Use the PNG to JPG Converter
The ToolNest AI PNG to JPG Converter processes images entirely in your browser:
- Upload your PNG — drag and drop or click to select. Batch conversion supported.
- Check the transparency warning — if your PNG has transparent areas, the tool will flag it and let you choose a fill background color.
- Adjust the quality slider — start at 82% for a good balance.
- Preview the result — side-by-side comparison helps you verify quality before downloading.
- Download the JPG — or adjust and try again.
Code Examples: PNG to JPG Programmatically
JavaScript (Canvas API — browser):
function pngToJpg(img, quality = 0.82, bgColor = '#ffffff') {
  const canvas = document.createElement('canvas');
  canvas.width = img.width;
  canvas.height = img.height;
  const ctx = canvas.getContext('2d');
  ctx.fillStyle = bgColor;
  ctx.fillRect(0, 0, canvas.width, canvas.height); // fill transparency
  ctx.drawImage(img, 0, 0);
  return canvas.toDataURL('image/jpeg', quality);
}
Python (Pillow):
from PIL import Image

img = Image.open('logo.png').convert('RGBA')

# Create white background and composite
background = Image.new('RGB', img.size, (255, 255, 255))
background.paste(img, mask=img.split()[3])  # alpha channel as mask
background.save('logo.jpg', quality=82, optimize=True)
Node.js (Sharp):
const sharp = require('sharp');

await sharp('input.png')
  .flatten({ background: { r: 255, g: 255, b: 255 } }) // fill transparency
  .jpeg({ quality: 82, progressive: true })
  .toFile('output.jpg');
Command line (ImageMagick):
# PNG to JPG with white background fill
convert input.png -background white -flatten -quality 82 output.jpg

# With dark background fill
convert input.png -background '#1a1040' -flatten -quality 82 output.jpg
The Python and ImageMagick examples above explicitly handle transparency — they composite the PNG over a background before encoding as JPEG. Without this step, transparent areas may produce unexpected results depending on the tool.
Common Mistakes
Mistake 1: Not checking for transparency before converting. Convert a logo PNG to JPG and send it to a client who uses it on a dark website — the white box appears in their final design. Always check whether your PNG has an alpha channel first.
Mistake 2: Setting quality too low for screenshots or text. Photographs handle aggressive compression well; screenshots with sharp text and hard color boundaries do not. If you're converting a UI screenshot, start at 85%+ to avoid obvious artifacts on text.
Mistake 3: Re-saving the output JPG multiple times. Each re-save of a JPEG compounds the quality loss. If you'll be editing the file further, keep the PNG as your working file and generate a fresh JPG export each time, rather than editing the JPG repeatedly.
Mistake 4: Not specifying a background fill. Letting the tool default to white works for images that appear on white pages, but is incorrect for any other context. Specify the fill color deliberately based on where the image will be used.
Mistake 5: Converting logos to JPG when transparency is required. A logo that needs to work on multiple background colors requires transparency — use PNG or WebP, never JPG.
Frequently Asked Questions
How much smaller will my JPG be compared to the PNG?
For photographic PNG content, expect 75-90% smaller at quality 80-85%. For screenshots and graphics, 50-75% is more typical. Results depend heavily on what's in the PNG — images with natural photographic variation compress much better than images with flat colors and sharp edges (where PNG's lossless compression is more efficient).
What happens to transparent areas when converting PNG to JPG?
They're filled with a solid background color. JPG has no alpha channel — it cannot represent transparency at all. Most tools default to white fill, but you should choose a fill color that matches where the image will appear. If you need to keep transparency, use PNG or lossy WebP instead of JPG.
What quality setting should I use?
75-85% is the recommended range for most web use. This produces files 75-90% smaller than PNG with artifacts invisible at normal viewing sizes. If you're converting screenshots or graphics with sharp text, use 85%+ to minimize visible artifacts at hard edges. Always use the side-by-side preview to verify quality for your specific image before downloading.
Is there a quality loss when converting from PNG to JPG?
Yes. JPG uses lossy compression, which permanently discards some pixel data. At high quality settings (85%+), the loss is typically invisible. At lower settings, block artifacts appear, especially in areas with sharp edges or fine detail. The lost data cannot be recovered — this is why you should keep the original PNG if you'll need to edit the image further.
Can I convert a PNG with transparency to JPG and keep the transparent background?
No. JPG cannot represent transparency at any quality setting — the format specification doesn't include an alpha channel. Transparent areas will be filled with a solid background color. If you need transparency in a smaller file format, use lossy WebP instead.
What is the difference between PNG to JPG and PNG to WebP?
Both JPG and lossy WebP can produce similar file sizes and similar visible quality. The key differences: WebP keeps the alpha channel (transparency), while JPG fills transparent areas with a solid color. JPG has universal software and platform support; WebP is supported by all modern browsers but has limited support in older desktop software and most email clients.
Does the PNG to JPG conversion preserve EXIF metadata?
PNG's metadata format and JPEG's EXIF metadata are different. Conversion tools vary in how they handle metadata transfer — some preserve it, some strip it. For web images, stripping metadata is often preferable for privacy (photos with GPS coordinates) and file size (metadata adds kilobytes). If preserving metadata is important, verify your specific tool's behavior.
About the author
Emir LočićI'm a developer focused on building practical online tools, with several years of experience in web development. I created ToolNest AI to make useful AI-powered tools simple, accessible, and free to use in one place.
Related Articles
JPG to PNG Converter: What Actually Changes and When to Use It
Converting JPG to PNG doesn't improve quality — it preserves it. Learn what the conversion actually does, why PNG files are larger, how to avoid common misconceptions, and when this conversion is genuinely useful. Free online tool.
Image Converter: JPG, PNG, WebP Compared + Free Online Tool
Learn the real differences between JPG, PNG, and WebP, lossy vs lossless compression, why re-saving JPG repeatedly degrades quality, and the transparency trap when converting to JPG. Free, instant tool.