How to Watermark Images: Placement, Opacity, Text vs Logo + Free Tool
Learn how to watermark images effectively — placement strategies, opacity settings, text vs logo trade-offs, Canvas API compositing, and what watermarks can and can't protect.
Founder & Developer, ToolNest AI
Published
A watermark is a visible mark that identifies the creator, owner, or copyright holder of an image. Done poorly, watermarks make images unusable and annoy viewers without meaningfully deterring theft. Done well, they mark ownership subtly, work as passive advertising, and make unauthorized use clearly traceable back to the original creator. This guide covers the practical decision-making behind effective watermarking — placement, opacity, type, and the realistic limits of what watermarks can actually protect.
Add text or logo watermarks to any image with the ToolNest AI Image Watermark tool — 9 positions, opacity control, free in your browser.
Placement Strategies
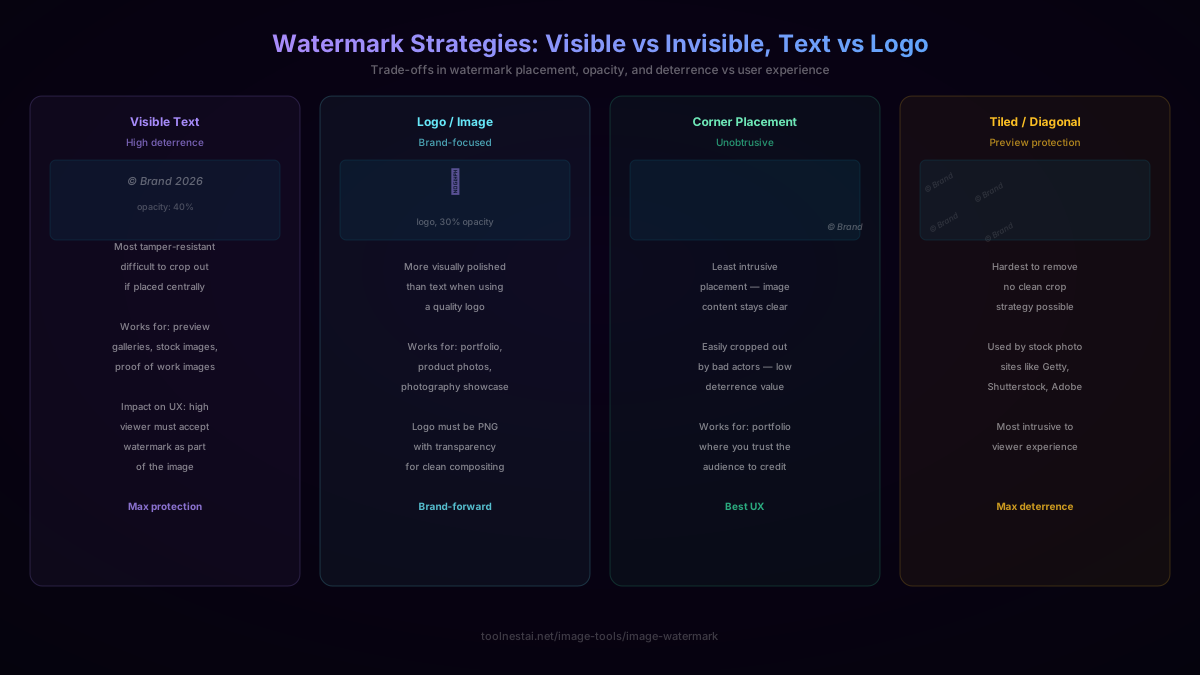
Placement is the most important variable in watermark design. Where you put it determines both how noticeable it is and how easy it is for a bad actor to remove it.
Corner Placement
Placing a watermark in one corner is the most common approach because it's the least intrusive — the main subject of the image remains unobscured, and viewers don't have to look through a watermark to understand what they're seeing.
The trade-off: corner watermarks are trivially easy to remove. A simple crop — cutting off 5–10% of the image from one corner — eliminates the watermark entirely and leaves the image fully usable. For this reason, corner watermarks are appropriate when you're primarily concerned with attribution (marking who made the image) rather than protection (preventing unauthorized use).
Best position: bottom-right for photography and social content; top-left for editorial images where the subject is frequently in the bottom-right area.
Center Placement
A larger, semi-transparent watermark placed over the center of the image is much harder to remove without damaging the content — cropping can't help if the watermark is in the middle of the frame. This is the approach used for preview or proof images: low-resolution previews that show a client what they're getting without giving them a usable final file.
The trade-off: it's intrusive. Viewers have to look through the watermark to see the image. This is acceptable for a preview context where you deliberately want the image to feel incomplete without payment, but wrong for a public portfolio.
Diagonal Tile
Repeating the watermark text or logo at a diagonal across the entire image in a grid pattern is the approach used by stock photography platforms (Getty Images, Shutterstock, Adobe Stock) for their preview images. It's essentially impossible to remove cleanly — every part of the image has watermark content, so cropping, cloning, or inpainting is required across the entire image.
The obvious trade-off is that it's very visually disruptive. This approach is only appropriate for a specific use case: showing potential buyers enough of the image to evaluate it while making the preview image completely unusable.
Nine-Point Grid
The ideal watermark tool offers a 3×3 grid of positions: top-left, top-center, top-right, middle-left, middle-center, middle-right, bottom-left, bottom-center, bottom-right. Different images need different positions — a portrait photo with sky above and ground below might need the watermark in the top-left so it doesn't overlap the subject's face.
Opacity: Finding the Right Balance
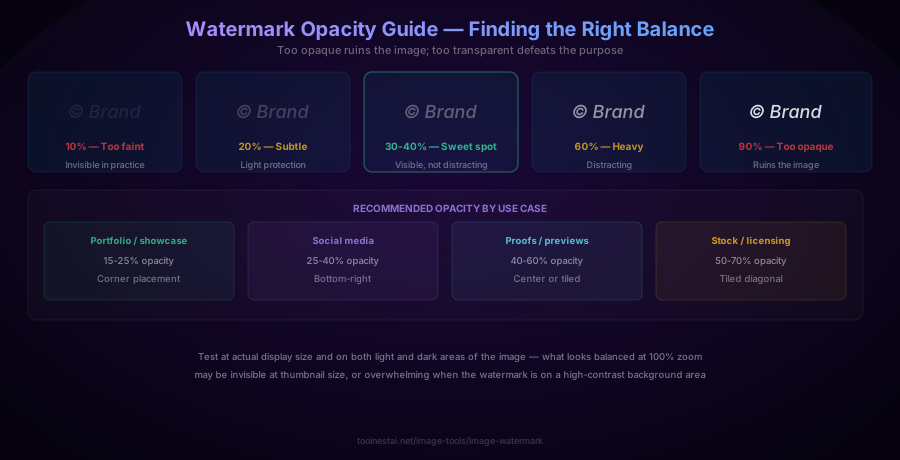
Opacity is the second most important variable. The goal is to find the minimum opacity that makes the watermark clearly readable while causing the minimum possible distraction to the image content.
10% opacity: Essentially invisible — the watermark is there technically but nearly impossible to read in practice, even in flat-colored areas. Defeats the purpose entirely.
20% opacity: Subtle and light. Works on images with large areas of consistent light or dark color where the mark will have good contrast. Often invisible on complex backgrounds.
30–40% opacity: The general sweet spot for most uses. Clearly readable, doesn't distract the viewer from the main content, works on a range of background complexity.
60% opacity: Heavy — the watermark starts to feel like it's competing with the image for attention. Appropriate for proof/preview contexts where you want viewers to be very aware that this isn't the final file.
75%+ opacity: The watermark dominates the image and essentially ruins it for any purpose other than demonstrating that the content exists.
Recommended by use case:
- Portfolio/showcase: 15–25%, corner placement
- Social media: 25–40%, bottom-right
- Client proofs: 40–60%, center or bottom-center
- Stock/licensing preview: 50–70%, tiled diagonal
Important testing note: Always check your watermark at the actual sizes where the image will be displayed, not just at 100% zoom. A 35% opacity text watermark that looks perfect on a 2000×3000 pixel image at full resolution may become barely visible — or conversely, distractingly heavy — when that image is displayed as a 400-pixel-wide card on a webpage. Test at thumbnail size too.
Also test how the watermark looks in both bright and dark areas of the image. A semi-transparent white watermark will be highly visible on dark areas and nearly invisible on light areas of the same image. If your image has both extremes, consider adding a thin shadow or outline to the watermark text.
Text Watermarks
Text watermarks are the most flexible option — they don't require any additional assets, you can include any information (copyright symbol, name, date, URL), and they display consistently across all images.
What to include in a text watermark:
- Copyright symbol (©) — makes the attribution intent clear
- Your name or brand name — identifies the owner
- Year — helps establish when the image was created (optional but useful)
- URL — passive advertising, helps people find you
A typical format: © Brand Name 2026 or © brandname.com
Font choice: Script or italic fonts can look more elegant for photography watermarks; sans-serif fonts are more professional and readable at small sizes. For very small watermarks, simpler fonts read better.
Color choice: White or light grey with a soft drop shadow works well on most images. You can also use a brand color if it works across different image backgrounds. A dual-layer approach — a white fill plus a dark shadow — makes the mark visible on both light and dark backgrounds.
Logo Watermarks
Logo watermarks look more professional than text for established brands, but they require more thought about the logo itself:
Logo must be PNG with a transparent background. A JPEG logo has a white or colored background that will appear as a rectangle on top of your image, which looks amateurish. If your logo was designed on a white background, either redesign it with transparency or extract it using background removal first.
Consider a monochrome watermark version. Many professional photographers and brands maintain a separate "watermark" variant of their logo — typically white or grey, simplified, without color. This version reads clearly as a watermark rather than a full brand logo presentation.
Size vs legibility trade-off. Too small and the logo is unrecognizable; too large and it's intrusive. A logo watermark should be readable at the display size — if it's going to be 20 pixels wide, a simple text watermark will be more legible than a complex logo at that scale.
Canvas compositing with a logo watermark:
function addLogoWatermark(img, logo, position, opacity) {
  const canvas = document.createElement('canvas');
  canvas.width = img.width;
  canvas.height = img.height;
  const ctx = canvas.getContext('2d');

  ctx.drawImage(img, 0, 0);

  const margin = 20;
  const logoWidth = Math.round(img.width * 0.15);  // 15% of image width
  const logoHeight = Math.round(logo.height * (logoWidth / logo.width));

  const positions = {
    'bottom-right': [img.width - logoWidth - margin, img.height - logoHeight - margin],
    'bottom-left':  [margin, img.height - logoHeight - margin],
    'top-right':    [img.width - logoWidth - margin, margin],
    'center':       [(img.width - logoWidth) / 2, (img.height - logoHeight) / 2],
  };

  const [x, y] = positions[position] || positions['bottom-right'];
  ctx.globalAlpha = opacity;
  ctx.drawImage(logo, x, y, logoWidth, logoHeight);
  ctx.globalAlpha = 1;

  return canvas;
}
Canvas API: Text Watermark Compositing
Adding a text watermark in the browser uses the Canvas 2D rendering API's text rendering with a custom alpha value:
function addTextWatermark(img, text, options = {}) {
  const {
    position = 'bottom-right',
    opacity = 0.35,
    fontSize = Math.max(16, Math.round(img.width * 0.02)),
    color = 'white',
    font = 'Arial',
  } = options;

  const canvas = document.createElement('canvas');
  canvas.width = img.naturalWidth;
  canvas.height = img.naturalHeight;
  const ctx = canvas.getContext('2d');

  ctx.drawImage(img, 0, 0);

  ctx.font = `${fontSize}px ${font}`;
  ctx.fillStyle = color;
  ctx.globalAlpha = opacity;

  // Optional: add shadow for visibility on both light and dark backgrounds
  ctx.shadowColor = 'rgba(0, 0, 0, 0.5)';
  ctx.shadowBlur = 4;
  ctx.shadowOffsetX = 1;
  ctx.shadowOffsetY = 1;

  const metrics = ctx.measureText(text);
  const margin = fontSize;
  const positions = {
    'bottom-right': [canvas.width - metrics.width - margin, canvas.height - margin],
    'bottom-left':  [margin, canvas.height - margin],
    'top-right':    [canvas.width - metrics.width - margin, fontSize + margin],
    'center':       [(canvas.width - metrics.width) / 2, canvas.height / 2],
  };

  const [x, y] = positions[position] || positions['bottom-right'];
  ctx.fillText(text, x, y);

  return canvas;
}
Python (Pillow) equivalent:
from PIL import Image, ImageDraw, ImageFont

def add_text_watermark(image_path, text, output_path, opacity=90):
    img = Image.open(image_path).convert("RGBA")
    overlay = Image.new("RGBA", img.size, (255, 255, 255, 0))
    draw = ImageDraw.Draw(overlay)

    font_size = max(16, img.width // 50)
    try:
        font = ImageFont.truetype("arial.ttf", font_size)
    except:
        font = ImageFont.load_default()

    text_bbox = draw.textbbox((0, 0), text, font=font)
    text_w = text_bbox[2] - text_bbox[0]
    text_h = text_bbox[3] - text_bbox[1]

    margin = font_size
    x = img.width - text_w - margin
    y = img.height - text_h - margin

    draw.text((x, y), text, font=font, fill=(255, 255, 255, opacity))

    watermarked = Image.alpha_composite(img, overlay)
    watermarked.convert("RGB").save(output_path)
What Watermarks Cannot Do
Understanding the limits of watermarks prevents relying on them for more protection than they provide:
Watermarks are not legal copyright protection. Your work is protected by copyright from the moment of creation regardless of whether it's watermarked. A watermark is a visible marker that identifies the owner and deters casual theft — it doesn't create any additional legal rights. If you want enforceable protection, register your copyright with the appropriate authority (in the US, the Copyright Office).
Watermarks can be removed. Even tiled watermarks can be removed with enough effort — AI inpainting tools have become increasingly capable of reconstructing image content beneath a watermark. A determined bad actor with access to modern AI tools (Photoshop Generative Fill, DALL-E inpainting, and similar) can remove many watermarks. The goal of a watermark is primarily deterrence and attribution, not absolute prevention.
Watermarks don't track usage. A visible watermark doesn't tell you where your image has been used — it just marks it. For tracking, you'd need invisible digital steganography (embedding imperceptible data in the pixel values), which is a different technology from visible watermarks.
Frequently Asked Questions
What's the best position for a watermark?
It depends on your goal. For portfolio or social media where you want low visual impact: bottom-right corner at 20–30% opacity. For proof images where you want to prevent unauthorized use: center placement at higher opacity. For maximum protection: diagonal tile across the whole image. The "best" position balances deterrence against visual impact based on your specific use case.
What opacity should I use for a watermark?
For most purposes, 25–40% opacity is a good starting point — clearly visible but not distracting. Lower for subtle portfolio marking (15–25%); higher for proof images (40–60%). Always test at the actual display size of the final image, since opacity perception changes significantly between a full-resolution image and a small thumbnail.
Should I use text or a logo watermark?
Text watermarks are simpler, more flexible, and work with no additional assets. Logo watermarks look more professional for established brands but require a PNG with a transparent background. If your logo was designed on a white background, use background removal first to create a transparent version before watermarking.
Do watermarks protect copyright?
Not legally — copyright exists automatically from the moment of creation regardless of watermarks. A watermark is a visible attribution mark and deterrent; it doesn't create any additional legal rights. For enforceable protection, register your copyright with the appropriate authority.
Can watermarks be removed?
Yes, with enough effort. Corner watermarks can be cropped out trivially. Central watermarks can be removed with Photoshop's clone stamp or heal tool. AI inpainting tools can reconstruct content beneath even tiled watermarks with varying quality. No visible watermark is truly "removal-proof" — the goal is deterrence and clear attribution, not absolute prevention.
How do I watermark many images at once?
For batch watermarking, command-line tools or scripts are most efficient. With Python's Pillow library, you can iterate over a directory of images and apply the same watermark to each. With ImageMagick: mogrify -font Arial -pointsize 24 -fill 'rgba(255,255,255,0.35)' -annotate +20+20 '© Brand' *.jpg.
About the author
Emir LočićI'm a developer focused on building practical online tools, with several years of experience in web development. I created ToolNest AI to make useful AI-powered tools simple, accessible, and free to use in one place.
Related Articles

Remove Background from Image: How AI Does It + Free Online Tool
Learn how AI background removal works using neural network segmentation, when it struggles with hair and glass, and the best techniques for perfect transparent PNG results.
Image Color Picker: HEX, RGB, HSL, CMYK Explained + Free Tool
Learn what HEX, RGB, HSL, and CMYK color formats are, when to use each, how dominant color extraction works, and how to pick any pixel color from an image in your browser.
Image Cropper: Aspect Ratios, Composition, and Platform Dimensions
Learn how image cropping works, the standard aspect ratios for every major platform, how to apply the rule of thirds for better composition, and the difference between crop and resize. Free online image cropper tool.