How to Rotate an Image: Lossless Steps, Free Angles, and EXIF Orientation Explained
Learn when image rotation is lossless, how EXIF orientation causes sideways photos, the math behind canvas expansion, and how to rotate images in code.
Founder & Developer, ToolNest AI
Published
Not all image rotation is equal. Rotating by 90°, 180°, or 270° is a lossless pixel reordering operation that doesn't touch color data at all. Rotating by an arbitrary angle like 15° or 37° requires interpolation, expands the canvas, and introduces a small amount of quality degradation. And then there's the EXIF orientation problem — where a photo is perfectly correctly oriented in the file's pixel data, but a metadata tag tells apps to display it differently, and some apps ignore the tag entirely.
Rotate any image with the ToolNest AI Image Rotator — 90° steps, any free angle, flip operations, and EXIF orientation fix, all in your browser.
Three Types of Rotation
90° / 180° / 270° Steps — Lossless
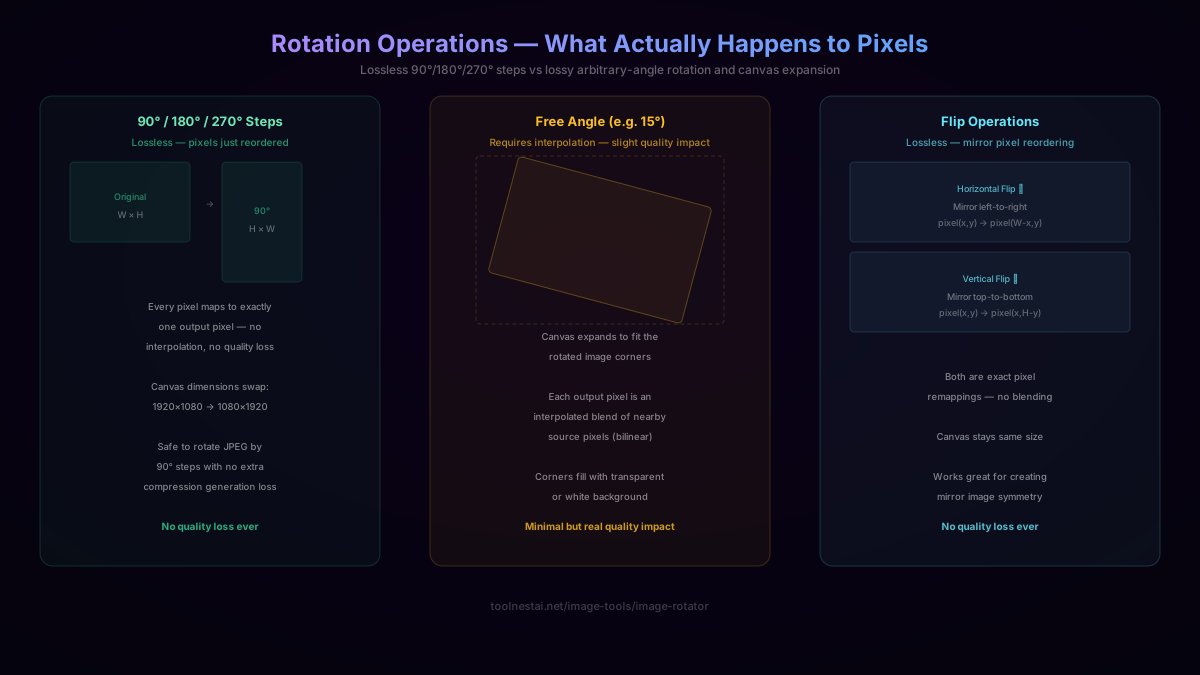
Rotating by exact right-angle multiples is a fundamentally different operation from rotating by an arbitrary angle. At 90°, 180°, and 270°, every source pixel maps to exactly one output pixel — there's no ambiguity about where it goes, and no blending is needed.
For a 90° clockwise rotation, the pixel at position (x, y) in the original image moves to position (H−1−y, x) in the output (where H is the height of the original). For 180°: (W−1−x, H−1−y). For 270° clockwise: (y, W−1−x). These are exact integer coordinate mappings with no fractional components — no interpolation, no color blending, zero information loss.
The canvas dimensions change: at 90° or 270°, width and height swap. A 1920×1080 landscape image becomes 1080×1920 after a 90° rotation. At 180°, the dimensions stay the same.
Important for JPEG: rotating a JPEG by 90°/180°/270° steps doesn't require re-running the lossy JPEG compression. The pixel data can be decompressed, the lossless transposition applied, and re-compressed — with specialized tools like jpegtran, this can actually be done at the DCT-block level without fully decompressing, making it truly lossless even in the JPEG domain. Browser-based tools that decode to canvas and re-encode do add a single additional lossy compression pass, though at the same quality setting the degradation is minimal.
Free Angle — Bilinear Interpolation
Rotating by a non-right-angle amount (say, 23.5°) places each output pixel's source coordinates at a non-integer position in the original image. No single source pixel maps exactly to the output — the output pixel must be computed from a weighted blend of the surrounding source pixels.
The standard approach is bilinear interpolation: for each output pixel, calculate where its center maps back to in the source image, then blend the four nearest source pixels weighted by their proximity. This produces smooth results without the pixelated staircasing that nearest-neighbor interpolation would cause, but it means every pixel value in the output is a computed blend rather than a direct copy.
This is why arbitrary-angle rotation introduces a small quality degradation: edges become slightly softer, and the result is technically a lossy transformation of the original. For small correction angles (±5°) the difference is invisible at normal viewing sizes; for large arbitrary angles like 45°, softening at edges can be more noticeable at 100% zoom.
Flip Operations — Lossless Mirror
Horizontal flip (mirror left-to-right): pixel at (x, y) moves to (W−1−x, y). Vertical flip (mirror top-to-bottom): pixel at (x, y) moves to (x, H−1−y). Both are exact integer coordinate mappings like the right-angle rotations — fully lossless, no interpolation, no quality impact.
Canvas dimensions stay unchanged for flip operations — a 1920×1080 image flips to another 1920×1080 image.
Combining flip with rotation: 180° rotation is equivalent to applying both horizontal and vertical flips sequentially.
EXIF Orientation: Why Photos Look Sideways
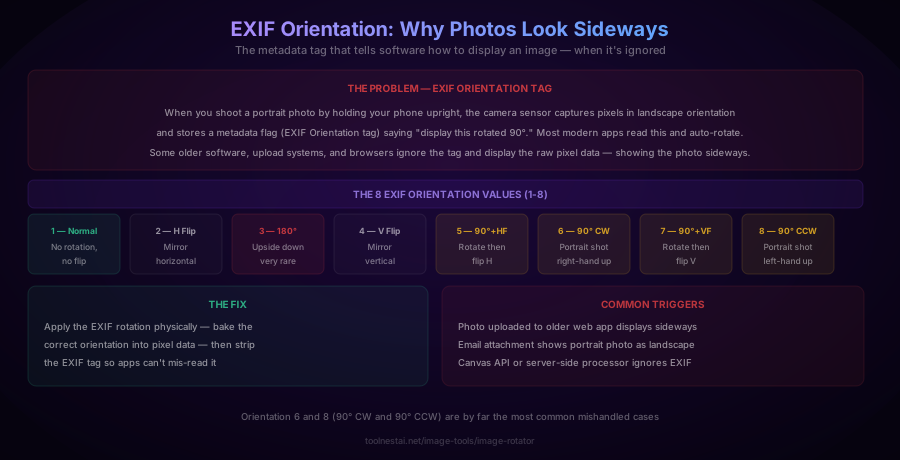
The EXIF orientation problem is surprisingly common and routinely confuses people who don't know why it happens.
What's happening: When you hold your phone in portrait orientation and take a photo, the camera sensor captures pixels in landscape orientation (because the sensor itself is landscape-shaped). The camera then stores a metadata tag in the JPEG file — EXIF Orientation — with a value that tells software "display this image rotated 90° clockwise." The pixel data itself is still in landscape order; the tag tells the viewer to compensate.
EXIF Orientation values:
- 1 — Normal: No rotation needed, display as-is
- 2 — Horizontal mirror: Flip left-right before display
- 3 — 180°: Rotate 180° before display (rare in practice)
- 4 — Vertical mirror: Flip top-bottom before display
- 5 — 90° CW + horizontal mirror: Rotate then flip
- 6 — 90° CW: Portrait shot held right-side up — the most common non-1 value
- 7 — 90° CCW + horizontal mirror: Rotate then flip
- 8 — 90° CCW: Portrait shot held upside down relative to landscape
Modern photo apps, browsers, and operating systems read EXIF Orientation and auto-rotate on display — you almost never notice it. The problem surfaces when:
- You upload to an older web application that doesn't read EXIF and displays raw pixel order
- An email client strips EXIF metadata, showing the raw orientation
- The image passes through server-side processing (Canvas API, some Python image libraries) that ignores EXIF
- You upload to a platform that strips EXIF from all images on ingest (very common — Twitter/X, WhatsApp, many CMSes do this)
The fix: Don't just write a corrected EXIF tag — actually apply the rotation to the pixel data, then strip the EXIF Orientation tag (or set it to 1). Once the pixel data is physically correct, the tag is unnecessary and can't be misread.
Canvas Expansion for Arbitrary Angles
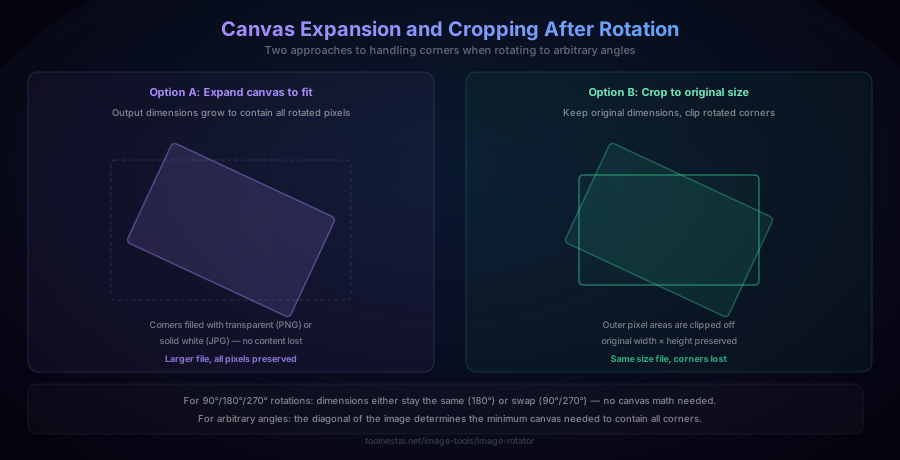
When rotating by an arbitrary angle θ, the rotated image is larger than the original in both dimensions. The minimum canvas needed to contain all four corners of the rotated image can be calculated:
New width  = |W · cos(θ)| + |H · sin(θ)|
New height = |W · sin(θ)| + |H · cos(θ)|
For a 1920×1080 image rotated 45°:
- New width = |1920 × 0.707| + |1080 × 0.707| = 1357 + 763 = 2120 px
- New height = |1920 × 0.707| + |1080 × 0.707| = 2120 px
The four corners of the original image now fall inside a 2120×2120 canvas, with triangular empty areas in each corner. These are filled with either:
- Transparent pixels (if outputting PNG with alpha channel)
- White or a chosen fill color (if outputting JPEG, which has no alpha)
Crop mode alternative: Some tools offer a "crop to original size" option — keep the output at the original W×H dimensions but clip any content that falls outside those bounds. This avoids corner artifacts but cuts off part of the image content at the edges.
For small correction angles (straightening a slightly tilted photo by ±2°), the corner areas are tiny triangles that contain very little image content, so either approach works fine. For large angles like 45°, the corner areas are significant.
Rotating Images in Code
JavaScript (Canvas API) — 90° clockwise:
function rotate90CW(img) {
  const canvas = document.createElement('canvas');
  canvas.width = img.height;
  canvas.height = img.width;
  const ctx = canvas.getContext('2d');
  ctx.translate(canvas.width / 2, canvas.height / 2);
  ctx.rotate(Math.PI / 2);
  ctx.drawImage(img, -img.width / 2, -img.height / 2);
  return canvas;
}
JavaScript — arbitrary angle with canvas expansion:
function rotateArbitrary(img, angleDeg) {
  const rad = angleDeg * Math.PI / 180;
  const sin = Math.abs(Math.sin(rad));
  const cos = Math.abs(Math.cos(rad));
  const canvas = document.createElement('canvas');
  canvas.width = Math.round(img.width * cos + img.height * sin);
  canvas.height = Math.round(img.width * sin + img.height * cos);
  const ctx = canvas.getContext('2d');
  ctx.translate(canvas.width / 2, canvas.height / 2);
  ctx.rotate(rad);
  ctx.drawImage(img, -img.width / 2, -img.height / 2);
  return canvas;
}
Python (Pillow) — with EXIF orientation fix:
from PIL import Image, ImageOps

def rotate_with_exif(image_path, output_path, degrees):
    img = Image.open(image_path)
    img = ImageOps.exif_transpose(img)  # fix EXIF orientation first
    rotated = img.rotate(-degrees, expand=True)  # negative for CW
    rotated.save(output_path)

# Pillow's expand=True handles canvas math automatically
# ImageOps.exif_transpose bakes in the EXIF rotation and strips the tag
Python — flip operations:
from PIL import Image

img = Image.open("photo.jpg")
h_flipped = img.transpose(Image.FLIP_LEFT_RIGHT)
v_flipped = img.transpose(Image.FLIP_TOP_BOTTOM)
Node.js (Sharp) — fast server-side rotation:
const sharp = require('sharp');

sharp('input.jpg')
  .rotate(90)          // respects EXIF by default and strips tag
  .toFile('output.jpg');

sharp('input.jpg')
  .rotate(45, { background: { r: 255, g: 255, b: 255, alpha: 1 } })
  .toFile('output.jpg');
Sharp handles EXIF orientation automatically — .rotate() with no argument applies the EXIF-specified rotation and strips the tag, which is exactly what you want for "fix orientation" functionality.
Common Use Cases
Straightening a crooked photo: Use free-angle input with small values (±1° to ±5°). This is a corrective rotation — the image was captured slightly tilted due to camera angle. The canvas expansion for small angles is negligible.
Fixing a sideways photo: The classic portrait-photo-displayed-sideways problem. Apply a 90° CW or 90° CCW rotation as a lossless step. If the issue is an EXIF tag being ignored, use "fix EXIF orientation" to bake the rotation into pixels.
Creating a mirrored image: Horizontal flip for a mirror image effect, selfie-correction (phone cameras capture mirror-reversed), or symmetry work. Flip is lossless.
Rotating for composition: Rotating landscape photos to a creative diagonal, or portrait photos to landscape for specific publishing formats. For exactly 90°, this is lossless; for other angles, use the expand-canvas approach to preserve all pixel content.
Frequently Asked Questions
Is rotating an image by 90° lossless?
Yes, for 90°, 180°, and 270° rotations: every pixel maps to exactly one output pixel with no blending needed. These are pure pixel reordering operations with zero quality loss — equivalent to transposing or rotating a matrix. Arbitrary angles (like 45° or 23.5°) require interpolation and are not perfectly lossless, though at small correction angles the difference is visually negligible.
Why does my photo look sideways when I upload it to a website?
This is almost certainly an EXIF orientation problem. Modern phones store the raw pixel data in one orientation and include an EXIF metadata tag (typically Orientation = 6 for right-hand portrait shots) telling software how to rotate it for display. Most apps read this and auto-rotate; some older or simplified systems don't. The fix is to physically apply the rotation to the pixel data and strip the EXIF tag, which the ToolNest AI Rotator does automatically with "Fix Orientation."
Does rotating a JPEG reduce quality?
Not if you rotate by exactly 90°, 180°, or 270°. These right-angle rotations can be applied as lossless pixel transpositions without re-running the JPEG compression algorithm. Rotating by an arbitrary angle (like 15°) does require bilinear interpolation and — when saved back as JPEG — a re-encoding step that introduces a small additional amount of JPEG compression. For practical purposes, a single re-encode at a high quality setting is visually indistinguishable from the original.
What happens to the canvas when I rotate by a free angle?
The canvas expands to contain all four corners of the rotated image. The new dimensions are calculated from |W·cos(θ)| + |H·sin(θ)| and |W·sin(θ)| + |H·cos(θ)|. The empty triangular corner areas fill with transparent pixels (PNG) or a fill color (JPEG). You can alternatively crop to the original dimensions, which clips the corners.
What's the difference between rotate and flip?
Rotation turns the image around its center by an angle (90°, 45°, any value). Flip mirrors the image along an axis: horizontal flip mirrors left-to-right (as if in a mirror), vertical flip mirrors top-to-bottom (as if placed face-down on a glass table). Both flip operations are lossless.
How do I fix EXIF orientation in code?
In Python: ImageOps.exif_transpose(img) from Pillow reads the EXIF Orientation tag, applies the correct physical rotation/flip to the pixel data, and strips the tag. In Node.js: Sharp's .rotate() with no argument does the same thing automatically. In FFmpeg: ffmpeg -i input.jpg -vf autorotate=1 output.jpg.
What's the best tool for batch rotating many images?
For large batches, command-line tools are most efficient. Sharp (Node.js) and Pillow (Python) both handle batches easily. For JPEG-only lossless 90° rotation without re-encoding, jpegtran -rotate 90 input.jpg output.jpg is the most precise — it operates on DCT blocks directly.
About the author
Emir LočićI'm a developer focused on building practical online tools, with several years of experience in web development. I created ToolNest AI to make useful AI-powered tools simple, accessible, and free to use in one place.
Related Articles
Image Cropper: Aspect Ratios, Composition, and Platform Dimensions
Learn how image cropping works, the standard aspect ratios for every major platform, how to apply the rule of thirds for better composition, and the difference between crop and resize. Free online image cropper tool.
Remove Background from Image: How AI Does It + Free Online Tool
Learn how AI background removal works using neural network segmentation, when it struggles with hair and glass, and the best techniques for perfect transparent PNG results.
Image Compressor: How to Reduce File Size Without Losing Quality
Learn how JPEG compression actually works, the optimal quality setting for web images, the difference between lossy and lossless compression, and the mistakes that silently degrade your images. Free online image compressor tool.