Image Sharpen: Unsharp Mask, Laplacian, and High-Pass Filter Explained
A technical guide to image sharpening — how unsharp mask works, the Laplacian kernel, high-pass filter method, correct parameter values, and how to avoid over-sharpening halos. With JavaScript, Python, and Sharp code examples.
Founder & Developer, ToolNest AI
Published
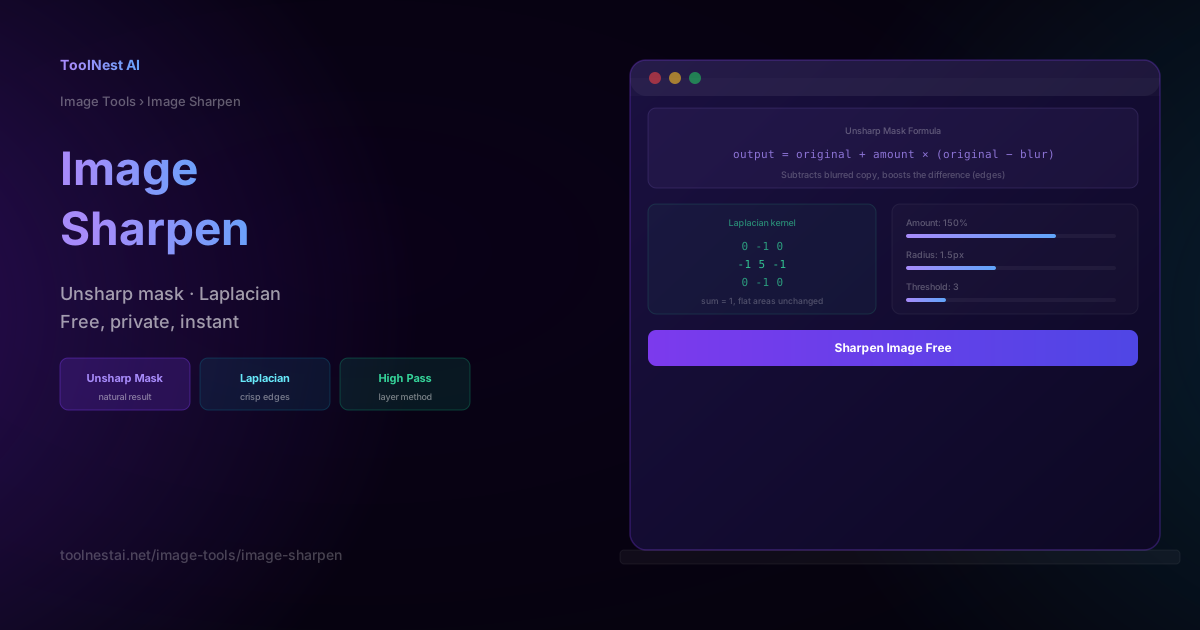
Sharpening is one of the most misunderstood adjustments in image processing. It doesn't add detail that wasn't there — it increases local contrast at edges, which makes existing edges look crisper to the human visual system. Done right, it makes images look vivid and professional. Done wrong, it creates unmistakable "halo" artifacts that reveal heavy-handed post-processing. Understanding how the algorithms actually work makes the difference.
Sharpen any image free with the ToolNest AI Image Sharpen tool — unsharp mask, Laplacian, and high-pass sharpening, all browser-side.
What Sharpening Actually Does
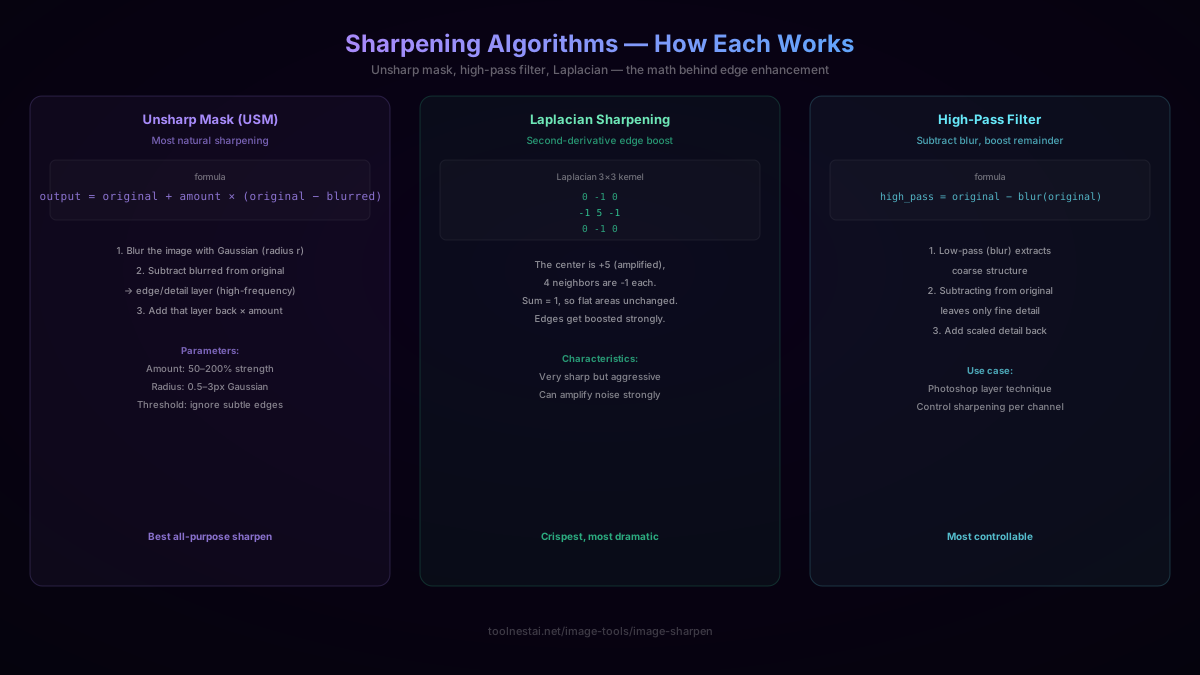
Sharpening doesn't recover original detail that blur has destroyed. If a photo was taken out of focus or with motion blur, no sharpening algorithm can reconstruct what the sensor never captured — that's a different problem requiring deconvolution or AI super-resolution.
What sharpening does is increase local contrast at edges. Human vision is particularly sensitive to edge transitions — the rate of change of brightness across a boundary — which is why crisp edges look "sharp" and gradual transitions look "soft." By boosting the contrast at edges, sharpening tricks the visual system into perceiving more detail than the pixel data technically contains.
Every classical sharpening algorithm works by:
- Identifying where edges are (areas of high brightness change)
- Increasing the contrast specifically at those locations
The difference between algorithms is how they identify edges and how aggressively they boost contrast there.
Unsharp Mask: The Standard Algorithm
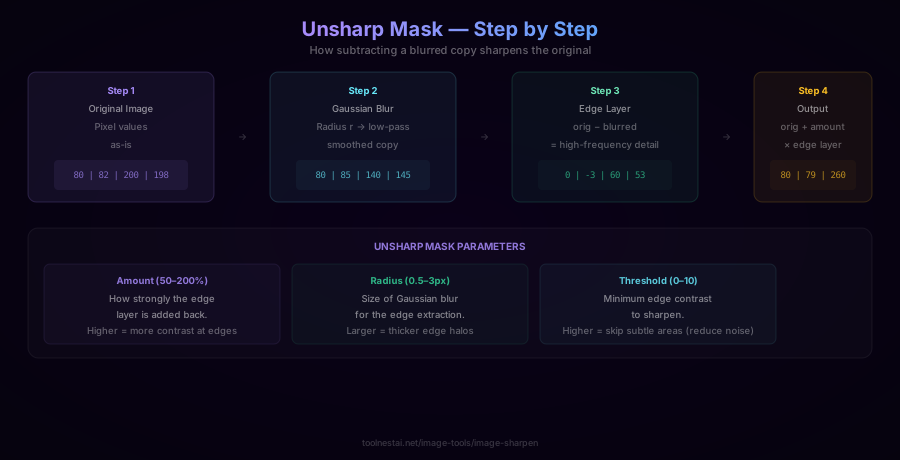
Despite the confusing name, Unsharp Mask (USM) is a sharpening algorithm, not a blurring one. The name comes from traditional darkroom photography, where a slightly unsharp (blurred) negative was combined with the original to produce an edge-boosted result.
The formula:
output = original + amount × (original − blur(original))
Step by step:
- Take the original image
- Apply Gaussian blur with radius
r→ produces a low-pass (blurred) copy - Subtract the blurred copy from the original → this leaves only high-frequency detail (edges and fine texture)
- Multiply that edge layer by
amount(the strength parameter) - Add it back to the original
The key insight: (original − blurred) is the "edge layer" — everywhere the image has a sharp transition, this layer has a non-zero value. Flat regions where blur doesn't change much produce nearly zero values, so those areas aren't affected.
JavaScript (Canvas API) implementation:
function unsharpMask(canvas, amount = 1.5, radius = 2) {
  const ctx = canvas.getContext('2d');
  const original = ctx.getImageData(0, 0, canvas.width, canvas.height);

  // Create blurred version
  ctx.filter = `blur(${radius}px)`;
  ctx.drawImage(canvas, 0, 0);
  ctx.filter = 'none';
  const blurred = ctx.getImageData(0, 0, canvas.width, canvas.height);

  // Restore original
  ctx.putImageData(original, 0, 0);

  const output = new ImageData(canvas.width, canvas.height);

  for (let i = 0; i < original.data.length; i += 4) {
    for (let c = 0; c < 3; c++) {
      const orig = original.data[i + c];
      const blur = blurred.data[i + c];
      const edge = orig - blur;             // high-frequency component
      const value = orig + amount * edge;   // boost edges
      output.data[i + c] = Math.max(0, Math.min(255, Math.round(value)));
    }
    output.data[i + 3] = 255;
  }

  ctx.putImageData(output, 0, 0);
}
USM parameters explained:
| Parameter | Range | Effect |
|---|---|---|
| Amount | 50–200% | How strongly the edge layer is added back. Higher = more dramatic sharpening. |
| Radius | 0.5–3px | Gaussian blur radius for edge extraction. Larger radius sharpens broader edges, thicker halos. |
| Threshold | 0–10 | Minimum edge contrast before sharpening is applied. Higher values skip subtle areas, reducing noise amplification. |
Good starting values: Amount=150%, Radius=1–2px, Threshold=3
Laplacian Sharpening: The Kernel Method
The Laplacian is a mathematical operator that detects edges by computing the second derivative of the image intensity — effectively finding where brightness is changing most rapidly.
For image processing, it's implemented as a convolution kernel. The most common 3×3 Laplacian sharpening kernel is:
 0  -1   0
-1   5  -1
 0  -1   0
The center value is +5, and each of the 4 direct neighbors is -1. Note that the sum of all kernel values is 1 (-4 + 5 = 1), which means flat areas where all surrounding pixels have the same value produce identical output to input (brightness is preserved). Edges, where neighboring pixel values differ, get their contrast dramatically increased.
There's also a version that includes diagonals:
-1  -1  -1
-1   9  -1
-1  -1  -1
This version has a sum of 1 as well, but affects diagonal edges more strongly.
JavaScript implementation:
function applyLaplacianSharpen(imageData) {
  const data = imageData.data;
  const width = imageData.width;
  const height = imageData.height;
  const output = new Uint8ClampedArray(data.length);

  const kernel = [0, -1, 0, -1, 5, -1, 0, -1, 0];

  for (let y = 1; y < height - 1; y++) {
    for (let x = 1; x < width - 1; x++) {
      for (let c = 0; c < 3; c++) {
        let sum = 0;
        for (let ky = -1; ky <= 1; ky++) {
          for (let kx = -1; kx <= 1; kx++) {
            const idx = ((y + ky) * width + (x + kx)) * 4 + c;
            sum += data[idx] * kernel[(ky + 1) * 3 + (kx + 1)];
          }
        }
        output[(y * width + x) * 4 + c] = Math.max(0, Math.min(255, sum));
      }
      output[(y * width + x) * 4 + 3] = 255;
    }
  }

  return new ImageData(output, width, height);
}
Laplacian vs. USM:
- Laplacian is a single-step operation (one convolution pass) — fast
- USM is more controllable — you can tune amount, radius, and threshold independently
- Laplacian is more aggressive and has no threshold to limit noise amplification
- USM produces more natural-looking results for portraits and photographs
- Laplacian is better for technical images (text, line art) where maximum edge contrast is the goal
High-Pass Filter: The Photoshop Layer Technique
The high-pass filter approach is a favorite among professional retouchers because it separates edge enhancement into an explicit layer you can control non-destructively.
high_pass_layer = original − blur(original) + 128
The +128 shifts the result to a neutral gray (128 is the mid-point of the 0–255 range), so areas with no edges appear as flat medium gray. When this layer is blended over the original using "Overlay" or "Soft Light" blend mode, the edges boost contrast without affecting mid-tones.
JavaScript:
function highPassSharpen(canvas, radius = 2, strength = 1.5) {
  const ctx = canvas.getContext('2d');
  const original = ctx.getImageData(0, 0, canvas.width, canvas.height);

  ctx.filter = `blur(${radius}px)`;
  ctx.drawImage(canvas, 0, 0);
  ctx.filter = 'none';
  const blurred = ctx.getImageData(0, 0, canvas.width, canvas.height);

  ctx.putImageData(original, 0, 0);

  const output = new ImageData(canvas.width, canvas.height);

  for (let i = 0; i < original.data.length; i += 4) {
    for (let c = 0; c < 3; c++) {
      const orig = original.data[i + c];
      const hp = orig - blurred.data[i + c] + 128; // high-pass layer
      // Overlay blend mode: if hp < 128 darken, if hp > 128 lighten
      let result;
      if (orig < 128) {
        result = 2 * orig * hp / 255;
      } else {
        result = 255 - 2 * (255 - orig) * (255 - hp) / 255;
      }
      output.data[i + c] = Math.max(0, Math.min(255, Math.round(
        orig + strength * (result - orig)
      )));
    }
    output.data[i + 3] = 255;
  }
  ctx.putImageData(output, 0, 0);
}
Python and Sharp Examples
Python (Pillow) — UnsharpMask:
from PIL import Image, ImageFilter

img = Image.open('photo.jpg')

# USM: radius=2px, percent=150%, threshold=3
sharpened = img.filter(
    ImageFilter.UnsharpMask(radius=2, percent=150, threshold=3)
)
sharpened.save('sharpened.jpg', quality=92)

# Simple edge-enhance for a quick pass
edge_enhanced = img.filter(ImageFilter.EDGE_ENHANCE)
Sharp (Node.js):
import sharp from 'sharp';

// Gaussian unsharp mask
await sharp('photo.jpg')
  .sharpen({
    sigma: 2,    // Gaussian radius
    m1: 0.5,     // flat areas — lower value = less noise amplification
    m2: 0.5,     // edge areas — higher value = stronger edge boost
    x1: 2,       // threshold for m1 falloff
    y2: 10,      // max brightness change
    y3: 20,      // max darkness change
  })
  .toFile('sharpened.jpg');
ImageMagick CLI:
# Unsharp mask: radius x sigma + amount + threshold
convert input.jpg -unsharp 0x2+1.5+0.05 output.jpg

# Strong sharpening
convert input.jpg -unsharp 2x1.4+0.6+0 output.jpg
Avoiding Over-Sharpening: Halo Artifacts
The most visible sign of excessive sharpening is halo artifacts — bright or dark rings that appear around edges in the image. They look like a slight glow around objects and are an unmistakable signal of over-processing.
Halos form because USM (and all similar algorithms) boosts the edge layer — which includes a bright fringe on one side and a dark fringe on the other side of every edge. At moderate sharpening levels, these fringes are subtle enough that the eye perceives them as "crisp edges." At high levels, they become visible as glowing rings.
How to avoid halos:
- Reduce Amount — the primary control; keep it below 200% for most images
- Reduce Radius — larger radius produces thicker, more visible halos
- Increase Threshold — forces the algorithm to ignore subtle edges (noise), applying sharpening only to strong, clear edges
- Check at 100% zoom — zoom to 100% (1:1) in your viewer to check for halo artifacts before finalizing
- Sharpen luminosity only — converting to Lab color space and sharpening only the L (lightness) channel avoids color fringing along edges
For portraits specifically: use a higher threshold (5–10) and limit amount to 100–120% — skin texture is fine detail that can become unpleasantly crunchy at high sharpening.
When to Sharpen and When Not To
Sharpen after resizing: Downsampling an image (reducing size) loses high-frequency detail and softens edges. It's standard practice to apply a moderate unsharp mask after any significant downsize operation before publishing.
Sharpen scanner output: Scanners produce slightly soft output due to the optical path. A modest USM (Amount=100%, Radius=1px, Threshold=3) is appropriate.
Sharpen final output, not intermediates: If you're planning further edits, keep the source unsharpened and apply sharpening as the final step before export. Sharpening an image then blurring it (or further processing it) compounds artifacts.
Don't sharpen before compression: Sharpening increases high-frequency content in the image, which compresses less efficiently and produces larger files or worse artifacts at the same JPEG quality level. Apply sharpening after compression optimization, or be aware that you may need a slightly higher quality setting.
Frequently Asked Questions
What is unsharp mask and why is it called that?
Unsharp mask is an image sharpening technique named after its darkroom photography origins. Photographers would sandwich an "unsharp" (slightly blurred) negative with the original to create a mask, then print through it — the combination boosted edge contrast. The digital implementation does the same thing mathematically: subtract a blurred version from the original to extract edges, then add the edge layer back amplified. The name is historical — it's a sharpening tool, not a blurring one.
What causes halo artifacts and how do I fix them?
Halos form when the edge-detection layer is added back too aggressively — the bright and dark fringes on either side of each edge become visible as glowing rings. To fix them: reduce Amount (primary control), reduce Radius (smaller kernel = thinner halos), or increase Threshold (apply sharpening only to strong edges). If the image is already sharpened and exported, there's no good way to remove halos except by reducing overall contrast at edges, which is a lossy operation.
What's the difference between USM and Laplacian sharpening?
Unsharp mask is a three-parameter algorithm (amount, radius, threshold) that extracts edges via Gaussian blur subtraction and adds them back amplified. Laplacian sharpening uses a fixed mathematical kernel that amplifies the second derivative at each pixel in a single convolution pass. USM is more controllable and produces more natural results for photographs; Laplacian is faster and produces crisper results for technical images but can amplify noise and lacks the threshold parameter to suppress it.
Should I sharpen my photos before or after resizing?
After. Downsampling (reducing size) softens the image and produces slightly blurry edges, making the output look less crisp. Applying a light unsharp mask after resize addresses this. If you sharpen before resizing, the sharpening effect is partially destroyed by the downsampling operation, and you may also introduce resampling artifacts around the already-boosted edges.
Can sharpening recover a blurry photo?
Sharpening increases local edge contrast — it cannot recover detail that was never captured. An out-of-focus photo lacks the high-frequency information to sharpen. What light sharpening can do is make the blurry edges slightly crisper-looking, which may improve perceived quality subjectively. For genuine focus/motion blur recovery, you'd need deconvolution (computationally intensive, requires knowing the blur kernel) or AI-based upscaling/deblur models.
What are good unsharp mask settings for portraits?
For portrait photography, the goal is to sharpen eyes, hair, and clothing without making skin texture appear harsh or noisy. Good starting values: Amount=100–120%, Radius=1px, Threshold=5–8. The higher threshold prevents the algorithm from sharpening smooth skin areas while still boosting the well-defined edges of eyes and facial features. Always check at 100% zoom — look at skin areas for unpleasant texture amplification.
About the author
Emir LočićI'm a developer focused on building practical online tools, with several years of experience in web development. I created ToolNest AI to make useful AI-powered tools simple, accessible, and free to use in one place.
Related Articles
Image Blur: Gaussian, Motion and Radial Blur Algorithms Explained
A deep dive into Gaussian, motion, radial, and box blur algorithms — how convolution kernels work, what sigma controls, and when to use each blur type for privacy blurring, creative effects, and background softening.
Brightness and Contrast: How Linear Shift, Contrast Stretch, and Gamma Work
A precise technical breakdown of brightness (linear shift), contrast (center stretch), gamma (power curve), and levels — with formulas, code examples in JavaScript and Python, histogram reading, and how to choose the right adjustment for your image.