Brightness and Contrast: How Linear Shift, Contrast Stretch, and Gamma Work
A precise technical breakdown of brightness (linear shift), contrast (center stretch), gamma (power curve), and levels — with formulas, code examples in JavaScript and Python, histogram reading, and how to choose the right adjustment for your image.
Founder & Developer, ToolNest AI
Published
Brightness and contrast adjustments are among the most common edits in image processing, but "brightness" and "contrast" are overloaded terms that mean different things depending on which software you're using. Photoshop's Brightness/Contrast works differently from CSS filter: brightness(), which works differently from Pillow's ImageEnhance.Contrast(). Understanding what each operation actually computes — the exact formula applied to pixel values — makes the difference between informed editing and random slider-dragging.
Adjust brightness, contrast, and gamma free with the ToolNest AI Brightness & Contrast tool — all processing is browser-side.
The Three Distinct Operations
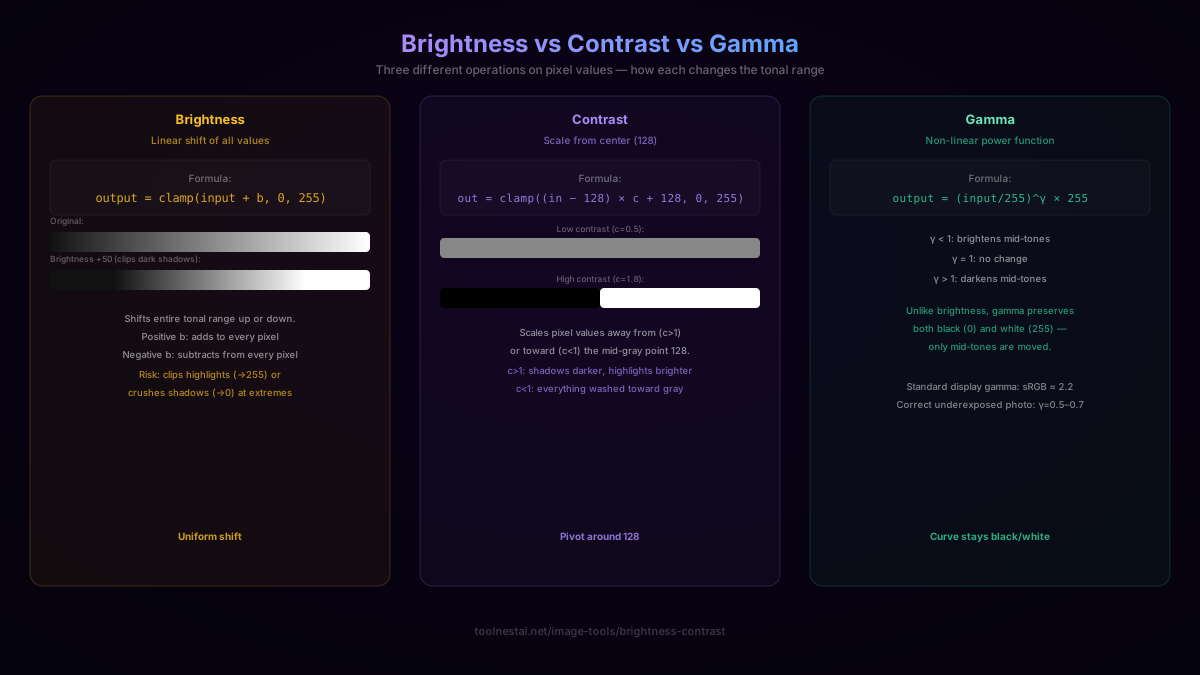
Brightness adds (or subtracts) a constant value from every pixel in the image. It's a linear shift of the entire tonal range.
Contrast scales pixel values away from (or toward) the mid-gray point at 128. High contrast pushes dark areas darker and bright areas brighter; low contrast collapses everything toward flat gray.
Gamma applies a power-law function that non-linearly adjusts mid-tones while leaving pure black and pure white unchanged.
Each one does something fundamentally different to the pixel data, and each is the right tool for a different kind of problem.
Brightness: Linear Shift
The formula for a brightness adjustment by value b is:
output = clamp(input + b, 0, 255)
For each channel (R, G, B) of each pixel, add b. Positive b makes the image lighter; negative b makes it darker. The clamp() function keeps values in the valid 0–255 range.
JavaScript (Canvas API):
function adjustBrightness(imageData, amount) {
  const data = imageData.data;

  for (let i = 0; i < data.length; i += 4) {
    data[i]     = Math.max(0, Math.min(255, data[i]     + amount)); // R
    data[i + 1] = Math.max(0, Math.min(255, data[i + 1] + amount)); // G
    data[i + 2] = Math.max(0, Math.min(255, data[i + 2] + amount)); // B
    // data[i + 3] = alpha, unchanged
  }
  return imageData;
}

// Usage: +50 brightens, -50 darkens
adjustBrightness(ctx.getImageData(0, 0, w, h), 50);
The key limitation: because brightness just adds a constant, it can clip values at the extremes. If a pixel's red channel is 230 and you add 50, the result clamps to 255 — all values above 205 become the same flat 255 (pure white), destroying the tonal distinction between them. This "clipping" of highlights or shadows is the main risk of large brightness adjustments.
CSS brightness():
.brighter { filter: brightness(1.4); }  /* 140% = 40% brighter */
.darker   { filter: brightness(0.7); }  /* 70% = 30% darker */
Note that CSS filter: brightness() is a multiplicative operation — brightness(1.4) multiplies each channel by 1.4, which is not the same as adding a constant. At low values it darkens shadows more than highlights (unlike additive brightness), and at high values it clips highlights.
Contrast: Scaling from Center
Contrast adjustment scales pixel values relative to the mid-gray point (128):
output = clamp((input − 128) × c + 128, 0, 255)
Where c is the contrast factor:
c > 1: increases contrast — shadows get darker, highlights get brighterc = 1: no changec < 1: decreases contrast — everything converges toward flat mid-gray (128)c = 0: the entire image becomes uniform mid-gray
The effect of this formula is a "pivot" around the value 128 — that exact mid-gray value never changes regardless of c. Values above 128 move upward for c > 1, values below 128 move downward. The further a pixel value is from 128, the more it moves.
JavaScript:
function adjustContrast(imageData, factor) {
  const data = imageData.data;

  for (let i = 0; i < data.length; i += 4) {
    for (let c = 0; c < 3; c++) {
      const value = data[i + c];
      data[i + c] = Math.max(0, Math.min(255,
        Math.round((value - 128) * factor + 128)
      ));
    }
  }
  return imageData;
}

adjustContrast(imageData, 1.5);  // 50% more contrast
adjustContrast(imageData, 0.5);  // 50% less contrast (flat/washed)
Combining brightness and contrast: The operations are independent, but applying contrast after brightness gives more predictable results than the reverse. Common practice for exposure correction: apply brightness first to get overall level right, then contrast to restore the tonal spread that clipping from the brightness operation may have partially compressed.
Gamma: The Non-Linear Adjustment
Gamma is a power-law transformation applied to the normalized (0–1) pixel value:
output = (input / 255)^γ × 255
The key mathematical property that distinguishes gamma from brightness: at input = 0, output = 0 regardless of γ. At input = 255, output = 255 regardless of γ. Pure black stays black; pure white stays white. Only the mid-tones are remapped.
- γ < 1: brightens mid-tones. γ = 0.5 maps the value 128 to about 182 (brighter)
- γ = 1: no change
- γ > 1: darkens mid-tones. γ = 2 maps the value 128 to about 64 (darker)
The exact formula for how much a given mid-tone moves: output = (128/255)^γ × 255. For γ=0.5: output = 0.502^0.5 × 255 ≈ 0.708 × 255 ≈ 181.
JavaScript:
function applyGamma(imageData, gamma) {
  const data = imageData.data;

  // Precompute a lookup table for speed (only 256 values)
  const lut = new Uint8Array(256);
  for (let i = 0; i < 256; i++) {
    lut[i] = Math.round(Math.pow(i / 255, gamma) * 255);
  }

  for (let i = 0; i < data.length; i += 4) {
    data[i]     = lut[data[i]];
    data[i + 1] = lut[data[i + 1]];
    data[i + 2] = lut[data[i + 2]];
  }
  return imageData;
}

applyGamma(imageData, 0.7); // brighten mid-tones
applyGamma(imageData, 1.4); // darken mid-tones
The lookup table optimization is important for performance: instead of computing Math.pow() for every pixel channel, precompute all 256 possible output values and do a simple array lookup per pixel.
Why gamma correction matters for displays: The sRGB standard (used by almost all consumer displays) applies a gamma curve of approximately 2.2 to pixel data before displaying it. A linear image saved without gamma encoding would appear far too dark on a calibrated sRGB monitor. When you see images looking unexpectedly dark or bright across different viewing software, gamma handling differences are often the cause.
Python (Pillow) Examples
from PIL import Image, ImageEnhance
import numpy as np

img = Image.open('photo.jpg')

# Brightness (Pillow's implementation is multiplicative, not additive)
bright = ImageEnhance.Brightness(img)
result = bright.enhance(1.4)  # 1.0 = original, >1 brighter, <1 darker

# Contrast
contrast = ImageEnhance.Contrast(img)
result = contrast.enhance(1.8)

# Manual gamma with NumPy (most precise)
def apply_gamma(img, gamma):
    arr = np.array(img, dtype=np.float64) / 255.0
    arr = np.power(arr, gamma)
    return Image.fromarray((arr * 255).astype(np.uint8))

brightened = apply_gamma(img, 0.7)  # γ < 1 brightens
Note on Pillow's Brightness: ImageEnhance.Brightness multiplies pixel values by the factor (like CSS brightness()), not adds. A factor of 0.0 produces pure black; 1.0 is unchanged; 2.0 doubles all values (clipping highlights). This is different from the additive definition above. Be aware of which operation a library uses.
Reading the Histogram
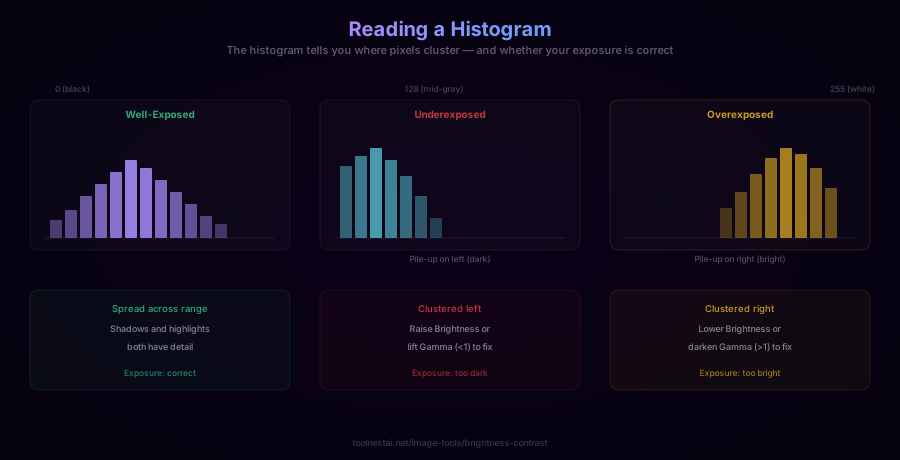
The histogram is the single most useful tool for evaluating and correcting exposure before applying adjustments. It shows the distribution of pixel values across the 0–255 range:
- X-axis: brightness from 0 (pure black, left) to 255 (pure white, right)
- Y-axis: how many pixels have that brightness value
Reading the shape:
A well-exposed image typically has a histogram that spreads across most of the 0–255 range without spiking hard at either end. There's no single "correct" shape — a high-key photo (intentionally bright) will have its mass toward the right, a night scene toward the left — but certain patterns indicate problems:
- Spike or wall at left (0): shadow clipping — dark areas have been crushed to pure black, losing shadow detail
- Spike or wall at right (255): highlight clipping — bright areas have been blown out to pure white, losing highlight detail
- Large gap at left: the image doesn't use the full shadow range — brightness should be lowered or gamma increased to expand the tonal range downward
- Large gap at right: the image doesn't use the full highlight range — brightness could be raised to use it
Practical workflow:
- Look at the histogram before adjusting
- If it's bunched left: raise brightness (+30 to +80) or gamma (0.6–0.8)
- If it's bunched right: lower brightness (−30 to −80) or gamma (1.2–1.5)
- If it's narrow/flat in the middle: increase contrast to stretch the tonal range
- After adjusting, check the histogram again for new clipping
Levels: Black and White Points
"Levels" is a more powerful version of brightness that lets you separately control where black and white land in the output:
function applyLevels(imageData, inputMin, inputMax, outputMin, outputMax) {
  const data = imageData.data;
  const scale = (outputMax - outputMin) / (inputMax - inputMin);

  for (let i = 0; i < data.length; i += 4) {
    for (let c = 0; c < 3; c++) {
      const value = data[i + c];
      let mapped = (value - inputMin) * scale + outputMin;
      data[i + c] = Math.max(0, Math.min(255, Math.round(mapped)));
    }
  }
  return imageData;
}

// Set black point to 20 (lift shadows) and white point to 230 (lower highlights)
applyLevels(imageData, 20, 230, 0, 255);
The Input Min/Max (black point/white point) specify which input pixel values should map to pure black (0) and pure white (255) in the output. Anything below inputMin → 0, anything above inputMax → 255. This is the most direct way to correct an image that has unused dynamic range at one or both ends of the histogram.
Frequently Asked Questions
What's the difference between brightness and gamma?
Brightness adds a constant to every pixel, shifting all values uniformly. This can clip highlights (pushing values above 255) or crush shadows (below 0). Gamma applies a power-law that remaps the mid-tones while leaving pure black (0) and pure white (255) unchanged. For correcting an underexposed image, gamma (γ < 1) is usually better than adding brightness, because it brightens mid-tones without clipping the highlights.
Why does high contrast make dark areas darker and bright areas brighter?
Contrast adjustment scales pixel values relative to the mid-gray point (128). Values above 128 are pushed further up; values below 128 are pushed further down. The further a value is from 128, the more it moves. This creates the characteristic "stretch" of contrast: the tonal range expands, making the image more visually dynamic but also risking clipping at both ends if over-applied.
What does clipping mean in image editing?
Clipping means a pixel value has been pushed past the valid range (0–255) and clamped to the boundary. Highlight clipping: a very bright pixel that should be 280 gets clamped to 255 — it becomes pure white and all tonal distinction above a certain brightness is lost (a "blown-out" highlight). Shadow clipping: a dark pixel pushed below 0 becomes pure black, losing shadow detail. On a histogram, clipping appears as a spike or wall at 0 or 255.
What is gamma and why is it non-linear?
Gamma is a power-law: output = input^γ. It's non-linear because a power function curves — it changes pixel values by different amounts at different brightness levels. γ < 1 brightens mid-tones more than shadows; γ > 1 darkens mid-tones more than highlights. The sRGB standard display gamma (≈2.2) was chosen to match human perception of brightness, which is also logarithmic. Many image adjustments in professional tools use gamma-encoded adjustments by default.
Should I use brightness or gamma to fix an underexposed photo?
Gamma is generally better for underexposed photos. A brightness adjustment (+50, for example) adds 50 to every pixel equally — your already-bright pixels get clipped to 255, losing highlight detail, while your shadow detail opens up. A gamma adjustment (γ=0.7) brightens mid-tones proportionally while leaving pure black at 0 and pure white at 255 — you get a more natural-looking result with less clipping risk.
How do I read a histogram to diagnose exposure problems?
The histogram shows how many pixels are at each brightness from 0 (black, left) to 255 (white, right). A spike or crowding on the left means the image is underexposed (too dark). A spike or crowding on the right means it's overexposed (too bright). A spike specifically at 0 or 255 indicates clipped data — lost detail that can't be recovered. A narrow, low histogram in the middle indicates a low-contrast, washed-out image.
About the author
Emir LočićI'm a developer focused on building practical online tools, with several years of experience in web development. I created ToolNest AI to make useful AI-powered tools simple, accessible, and free to use in one place.
Related Articles

Image Filters: How Sepia, Vintage, HDR, Noir and 13 More Effects Work
A technical and practical guide to photo filter algorithms — color matrix operations, tone curves, saturation adjustments, and artistic effects — with JavaScript and CSS code examples and guidance on when to use each filter.

Grayscale Conversion: Average, BT.601, BT.709, and Luminance Explained
A technical deep-dive into every grayscale conversion method — simple average, BT.601 luma, BT.709 luminance, HSL lightness, and channel extraction — with formulas, JavaScript and Python code, and guidance on when to use each.