Image Blur: Gaussian, Motion and Radial Blur Algorithms Explained
A deep dive into Gaussian, motion, radial, and box blur algorithms — how convolution kernels work, what sigma controls, and when to use each blur type for privacy blurring, creative effects, and background softening.
Founder & Developer, ToolNest AI
Published
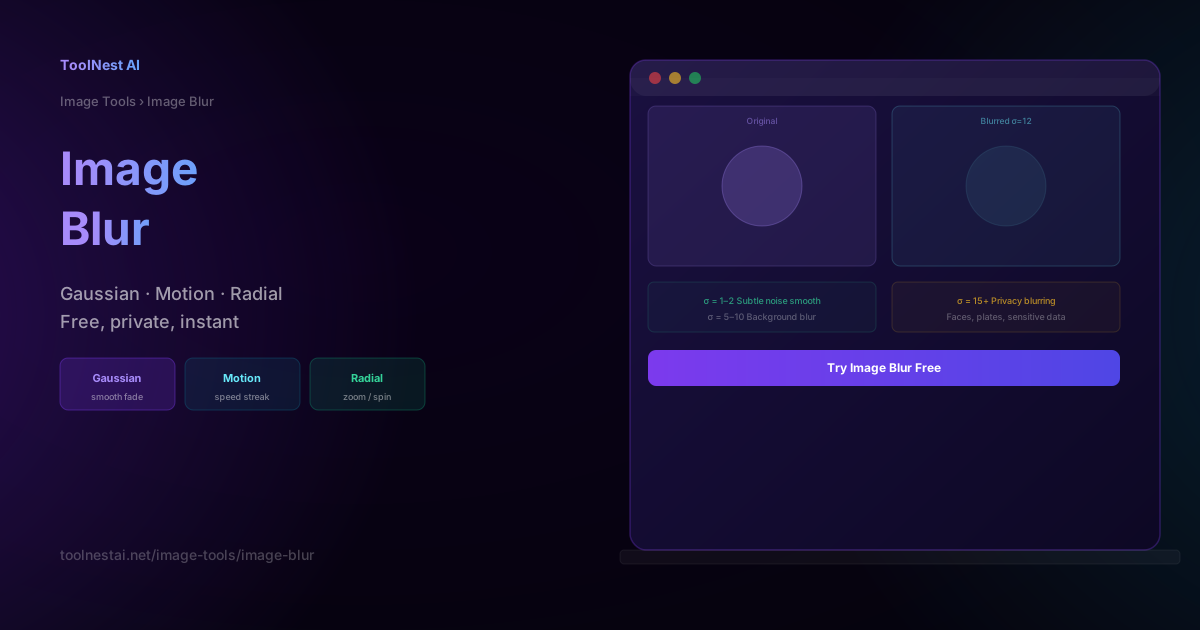
Blur sounds like something you do when an image is bad — but it's one of the most useful and mathematically interesting image processing operations that exists. Gaussian blur smooths skin in portraits, reduces noise in night photography, powers the CSS backdrop filter your browser uses right now, and protects privacy in screenshots and documents. Motion blur adds energy to still images. Radial blur creates explosion and zoom effects. Each type works by a different mathematical sampling strategy, and understanding which to use when makes the difference between a professional result and an amateurish one.
Apply any blur type free with the ToolNest AI Image Blur tool — Gaussian, motion, radial, and box blur, fully browser-side.
How Image Blur Works: Convolution Kernels
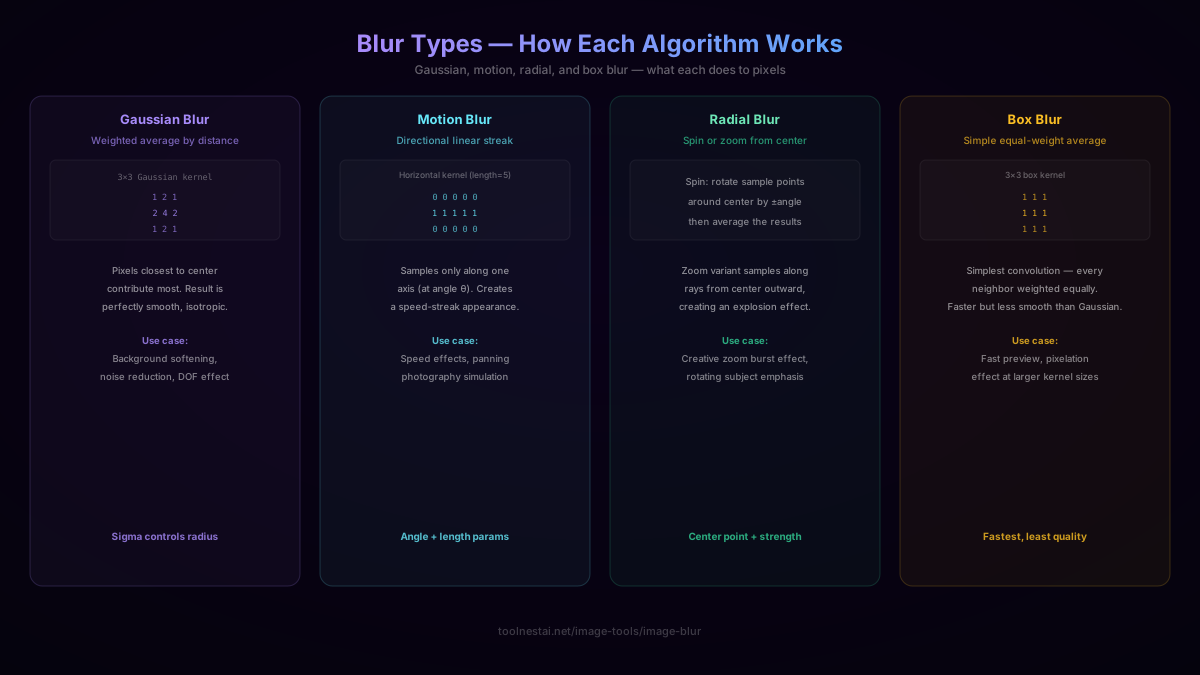
Every classical blur algorithm uses convolution — for each output pixel, you take a weighted average of the surrounding pixels in the input image. The pattern of weights is called a kernel (also called a filter or mask). The kernel determines what kind of blur you get:
- A symmetric, bell-curve-weighted kernel → Gaussian blur (smooth, natural)
- A linear kernel along one direction → motion blur (directional streak)
- Sampling along circular or radial paths → radial blur (spin or zoom)
- An equal-weight rectangular kernel → box blur (faster, less smooth)
For a kernel of radius r, the output pixel at position (x, y) is:
output(x,y) = Σ kernel(dx,dy) × input(x+dx, y+dy)
                dx,dy ∈ [-r, r]
Where Σ kernel(dx,dy) = 1 (all weights sum to 1, so average brightness is preserved).
Gaussian Blur: The Bell Curve Kernel
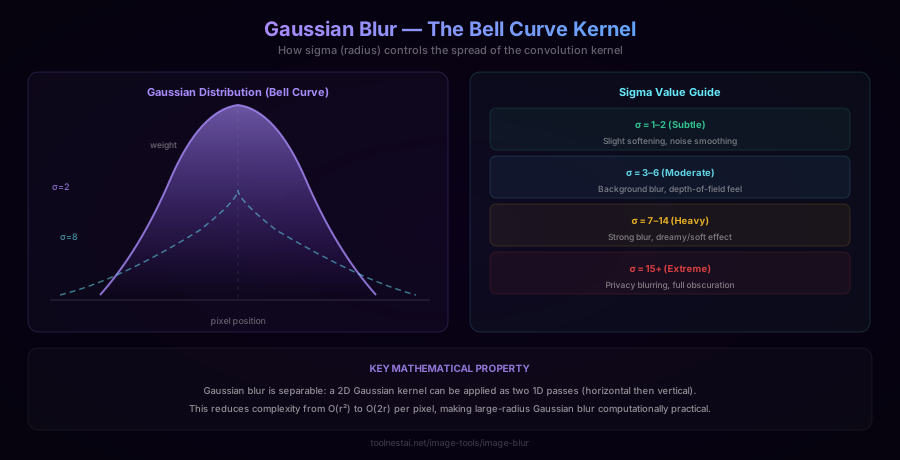
Gaussian blur is the most widely used blur algorithm, and for good reason: it's mathematically elegant, perceptually natural-looking, and computationally efficient thanks to a property called separability.
The weight assigned to a neighboring pixel at offset (dx, dy) follows a 2D Gaussian (normal) distribution:
weight(dx, dy) = e^(-(dx² + dy²) / (2σ²)) / (2πσ²)
Where σ (sigma) is the standard deviation — essentially, the radius parameter. Larger sigma means a wider, flatter bell curve: more distant pixels contribute more, producing more blur.
Practical sigma guide:
| Sigma | Effect |
|---|---|
| 1–2 | Subtle softening, slight noise reduction |
| 3–6 | Moderate background blur, skin softening |
| 7–14 | Heavy blur, dreamy/soft aesthetic |
| 15+ | Privacy blurring, face/text obscuration |
Why Gaussian blur is efficient: A 2D Gaussian kernel is mathematically separable — you can apply it as two consecutive 1D passes: first horizontal, then vertical. This reduces the computational complexity from O(r²) operations per pixel to O(2r) — a huge saving for large radii. A sigma=20 blur requires a ~120-pixel-wide kernel; without separability, that's 14,400 multiplications per pixel. With separability, it's 240.
CSS Gaussian blur:
/* Blur the element itself */
.blurred { filter: blur(8px); }

/* Blur the content behind an element (glassmorphism) */
.glass { backdrop-filter: blur(12px); }
Canvas API:
ctx.filter = 'blur(8px)';
ctx.drawImage(sourceImage, 0, 0);
ctx.filter = 'none'; // always reset after
Python (Pillow):
from PIL import Image, ImageFilter

img = Image.open('photo.jpg')
blurred = img.filter(ImageFilter.GaussianBlur(radius=8))
blurred.save('blurred.jpg')
Sharp (Node.js):
import sharp from 'sharp';

await sharp('photo.jpg')
  .blur(8) // sigma value
  .toFile('blurred.jpg');
Motion Blur: Directional Streaks
Motion blur simulates the appearance of a moving object or panning camera — the distinctive linear streak seen when shutter speed is too slow for the scene's movement speed.
The kernel is a 1D line of equal weights oriented at a specific angle. For a horizontal motion blur of length L:
kernel = [ 1/L, 1/L, 1/L, ... ] (L elements)
For arbitrary angle θ, the sampling is done along the line (cos(θ), sin(θ)) from the center pixel.
Canvas API implementation:
function applyMotionBlur(canvas, angle, length) {
  const ctx = canvas.getContext('2d');
  const imageData = ctx.getImageData(0, 0, canvas.width, canvas.height);
  const output = new ImageData(canvas.width, canvas.height);

  const dx = Math.cos(angle * Math.PI / 180);
  const dy = Math.sin(angle * Math.PI / 180);

  for (let y = 0; y < canvas.height; y++) {
    for (let x = 0; x < canvas.width; x++) {
      let r = 0, g = 0, b = 0, count = 0;

      for (let i = 0; i < length; i++) {
        const sx = Math.round(x + dx * (i - length/2));
        const sy = Math.round(y + dy * (i - length/2));

        if (sx >= 0 && sx < canvas.width && sy >= 0 && sy < canvas.height) {
          const idx = (sy * canvas.width + sx) * 4;
          r += imageData.data[idx];
          g += imageData.data[idx + 1];
          b += imageData.data[idx + 2];
          count++;
        }
      }

      const outIdx = (y * canvas.width + x) * 4;
      output.data[outIdx] = r / count;
      output.data[outIdx + 1] = g / count;
      output.data[outIdx + 2] = b / count;
      output.data[outIdx + 3] = 255;
    }
  }

  ctx.putImageData(output, 0, 0);
}

// Usage: 0° = horizontal right, 90° = vertical down
applyMotionBlur(canvas, 0, 20); // horizontal, length 20px
Common angles:
- 0° — horizontal motion (left-right pan)
- 90° — vertical motion (vertical pan)
- 45° — diagonal (common for "speed" graphics)
- Any custom angle for matching the subject's actual movement direction
Python (Pillow):
from PIL import ImageFilter

# Pillow's built-in kernel for motion blur
kernel_size = 15
kernel = ImageFilter.Kernel(
    size=kernel_size,
    kernel=[1] * kernel_size,
    scale=kernel_size,
    offset=0
)
blurred = img.filter(kernel)
Radial Blur: Spin and Zoom
Radial blur is a purely creative effect that doesn't correspond to normal camera physics, but produces striking visual results. There are two variants:
Spin blur rotates the sampling points around a center point by a small angle, then averages them. The result is a circular smearing that looks like a spinning object.
Zoom blur samples along radial lines outward from the center, averaging samples at increasing distances from center. The result looks like moving rapidly toward (or away from) the image.
Both variants create a strong visual anchor at the center point (which remains unblurred) while the surrounding content streaks toward or around it.
function applyZoomBlur(canvas, centerX, centerY, strength) {
  const ctx = canvas.getContext('2d');
  const src = ctx.getImageData(0, 0, canvas.width, canvas.height);
  const output = new ImageData(canvas.width, canvas.height);
  const steps = 10;

  for (let y = 0; y < canvas.height; y++) {
    for (let x = 0; x < canvas.width; x++) {
      let r = 0, g = 0, b = 0;

      for (let s = 0; s < steps; s++) {
        const t = s / steps * strength;
        const sx = Math.round(centerX + (x - centerX) * (1 - t));
        const sy = Math.round(centerY + (y - centerY) * (1 - t));

        const clampedX = Math.max(0, Math.min(canvas.width - 1, sx));
        const clampedY = Math.max(0, Math.min(canvas.height - 1, sy));
        const idx = (clampedY * canvas.width + clampedX) * 4;

        r += src.data[idx];
        g += src.data[idx + 1];
        b += src.data[idx + 2];
      }

      const outIdx = (y * canvas.width + x) * 4;
      output.data[outIdx] = r / steps;
      output.data[outIdx + 1] = g / steps;
      output.data[outIdx + 2] = b / steps;
      output.data[outIdx + 3] = 255;
    }
  }

  ctx.putImageData(output, 0, 0);
}
Box Blur: Fast but Less Smooth
Box blur assigns equal weight to every pixel within a rectangular neighborhood — the simplest possible convolution. For a (2r+1) × (2r+1) box:
function applyBoxBlur(imageData, radius) {
  const data = imageData.data;
  const width = imageData.width;
  const height = imageData.height;
  const output = new Uint8ClampedArray(data.length);

  for (let y = 0; y < height; y++) {
    for (let x = 0; x < width; x++) {
      let r = 0, g = 0, b = 0, count = 0;

      for (let dy = -radius; dy <= radius; dy++) {
        for (let dx = -radius; dx <= radius; dx++) {
          const nx = x + dx, ny = y + dy;
          if (nx >= 0 && nx < width && ny >= 0 && ny < height) {
            const idx = (ny * width + nx) * 4;
            r += data[idx]; g += data[idx+1]; b += data[idx+2];
            count++;
          }
        }
      }

      const outIdx = (y * width + x) * 4;
      output[outIdx] = r/count; output[outIdx+1] = g/count;
      output[outIdx+2] = b/count; output[outIdx+3] = data[outIdx+3];
    }
  }

  return new ImageData(output, width, height);
}
Box blur is faster than Gaussian for small radii and produces the "pixelation" effect at large radii, since it averages large uniform blocks. For most quality-sensitive uses, Gaussian is preferable.
Privacy Blurring: Obscuring Sensitive Information
One of the most practical applications of blur is protecting sensitive content in screenshots, recordings, and photos before sharing them. The right approach depends on what you're trying to obscure:
Faces and people: Gaussian blur with sigma 15–30 applied to the bounding box of each face. Most face detection libraries can provide the bounding box coordinates. Faces become unrecognizable while the surrounding image remains clear.
License plates: Gaussian sigma 20–40, or pixelation (large box blur with small output grid). Plates are small and need aggressive treatment.
Screen content / text: Pixelation (box blur at very large kernel, then scale back up) is harder to reverse than Gaussian for text. The discrete block structure destroys letter shapes more completely.
Entire background: Lower sigma (3–8) is sufficient to make background content unreadable while keeping the foreground subject clear.
Important caveat: Blur is not encryption. Research has shown that sufficiently strong AI models can partially reconstruct blurred text and faces, especially at lower sigma values. For genuinely sensitive information (passwords, SSNs, medical data), use solid black or white rectangles over the content, not blur. Blur is suitable for reducing inadvertent background disclosure, not for security-critical redaction.
Choosing the Right Blur
| Goal | Recommended blur | Settings |
|---|---|---|
| Smooth noise / skin | Gaussian | σ = 1–4 |
| Bokeh / background defocus | Gaussian | σ = 5–15 |
| Speed / motion effect | Motion | 0–45°, length 15–30px |
| Creative zoom burst | Radial (zoom) | Center focused, strength 20–40% |
| Spinning subject | Radial (spin) | Centered on subject |
| Privacy blurring | Gaussian or pixelation | σ = 20+ |
| Fast preview | Box | r = 3–10 |
Frequently Asked Questions
What's the difference between Gaussian blur and regular blur?
"Regular blur" in CSS (filter: blur()) IS Gaussian blur. The term "blur" without qualification almost always means Gaussian, because it's the most natural-looking and widely used algorithm. Gaussian blur uses a bell-curve-weighted kernel where nearby pixels contribute more than distant ones — this produces a smooth, natural result unlike the equal-weight box blur.
What does sigma mean in Gaussian blur?
Sigma (σ) is the standard deviation of the Gaussian distribution used to weight pixels in the convolution kernel. A larger sigma means a wider bell curve: more distant pixels contribute, producing a stronger blur. Sigma approximately equals the "effective radius" of the blur — a sigma of 8 affects pixels roughly 8–16 pixels away from each point in the output.
How does motion blur work and what angle should I use?
Motion blur applies an equal-weight linear kernel along a specific angle — essentially averaging the pixel with its neighbors in a line. Use 0° for horizontal motion (left-right), 90° for vertical, 45° for diagonal. For the most realistic result, match the angle to the direction the subject was actually moving in the scene.
Can blurred images be unblurred?
Gaussian blur is a lossy, irreversible operation — you cannot mathematically recover the original. However, AI image enhancement tools can make educated guesses about what a blurred face or text might have said, especially at low sigma values. For security-critical redaction, use solid opaque rectangles rather than blur.
What blur type works best for privacy blurring faces?
Gaussian blur with sigma 15–30 is the standard approach for faces. For maximum security, use pixelation (reduce the face region to large squares, then scale back up) — the discrete block structure is harder for AI to reconstruct than a continuous Gaussian blur. Never rely on blur alone for genuinely sensitive security redaction.
Why does my CSS blur look different from my Canvas blur?
CSS filter: blur() uses the browser's GPU-accelerated Gaussian implementation. Canvas ctx.filter = 'blur()' also uses the browser's Gaussian but renders it to a 2D bitmap. If you're implementing blur manually in Canvas pixel-by-pixel, slight differences can occur from rounding and boundary handling. For most practical purposes, both methods produce visually identical results at the same sigma.
About the author
Emir LočićI'm a developer focused on building practical online tools, with several years of experience in web development. I created ToolNest AI to make useful AI-powered tools simple, accessible, and free to use in one place.
Related Articles
Image Sharpen: Unsharp Mask, Laplacian, and High-Pass Filter Explained
A technical guide to image sharpening — how unsharp mask works, the Laplacian kernel, high-pass filter method, correct parameter values, and how to avoid over-sharpening halos. With JavaScript, Python, and Sharp code examples.
Image Filters: How Sepia, Vintage, HDR, Noir and 13 More Effects Work
A technical and practical guide to photo filter algorithms — color matrix operations, tone curves, saturation adjustments, and artistic effects — with JavaScript and CSS code examples and guidance on when to use each filter.